Search This Blog

Thursday, October 30, 2014

Salvation Palette -Colour Chaos by Makeup REVOLUTION a dupe for Urban Decay Electric palette!!

Hy guys, after many nail related posts it's time for another make-up one =)
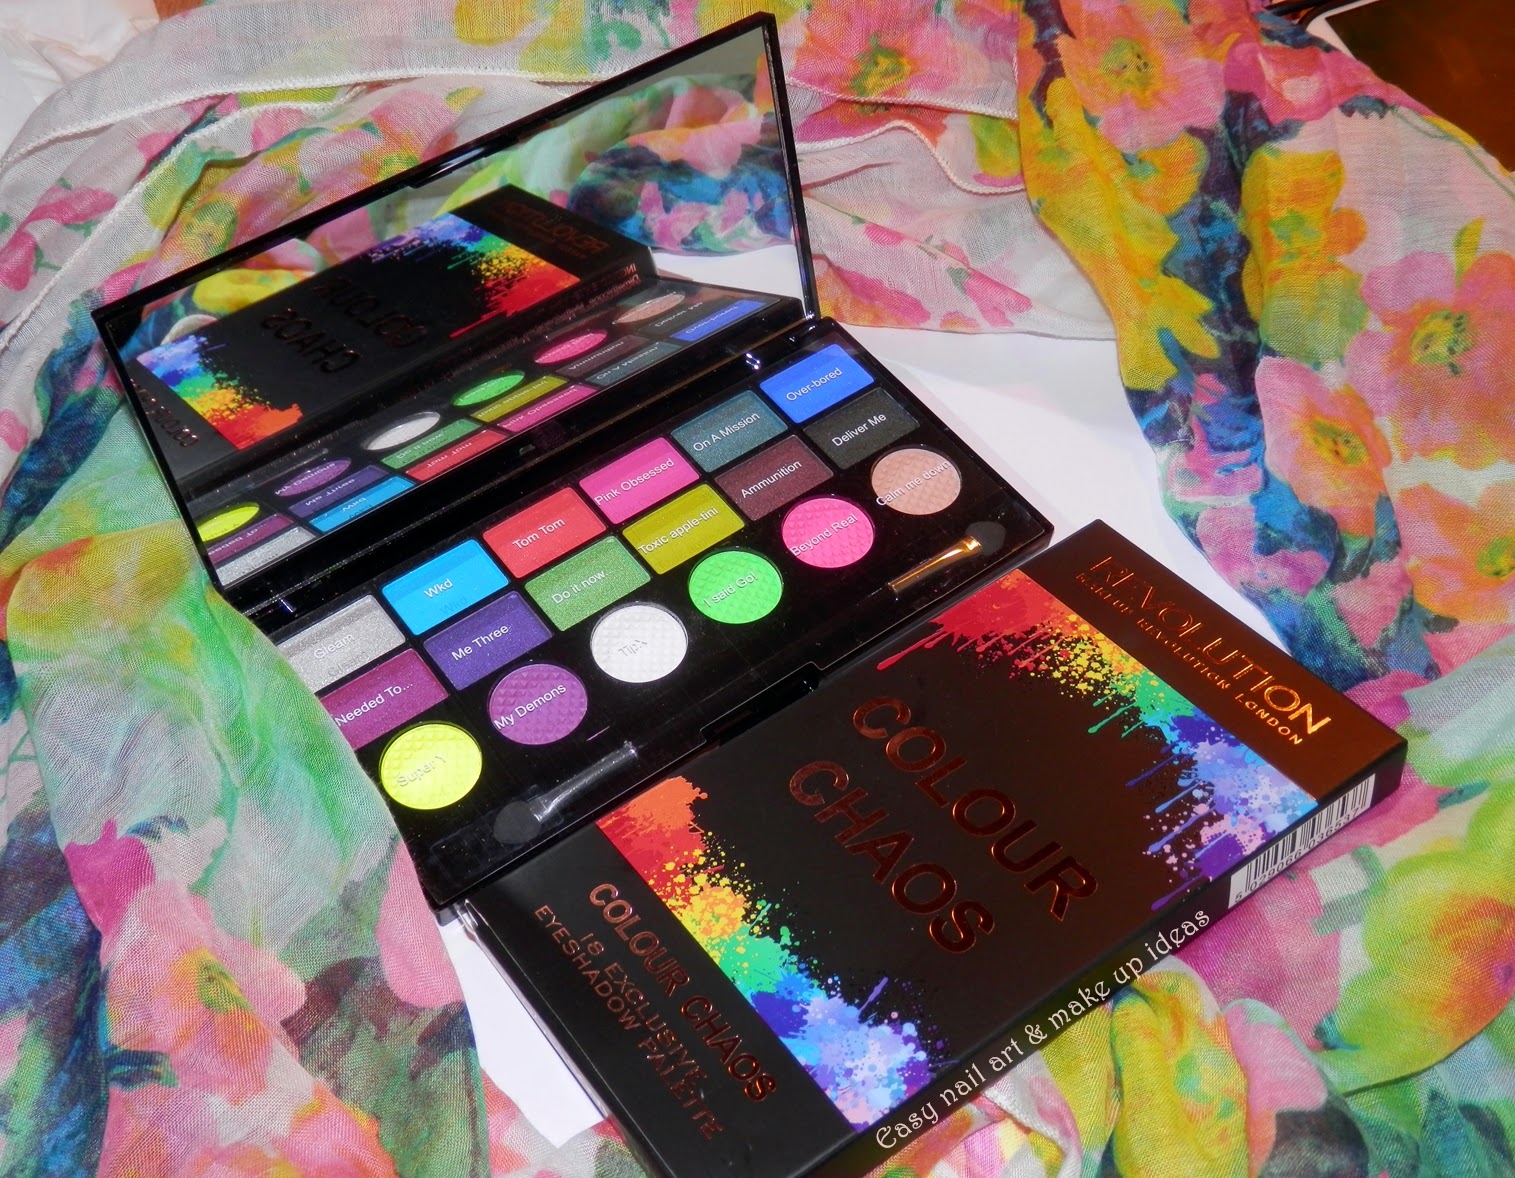
Today I'm gonna show  you my favorite eye shadow palette at the moment. As you can tell from the title it's a Colour Chaos palette by Makeup REVOLUTION!!


I've discovered this brand not so long ago on facebook, it's a young cosmetic brand that launched in London in March 2014. 
They have dupes for lot of high end brands such as Urban Decay, Nars, Tarte etc. but for very affordable price and great quality!! I have to mention they're also cruelty free!!!
The products can be bought worldwide from their WEB PAGE for £6,00 and you Croatian ladies can get them on PINK PANDA for 60,90 kn. It's actually on sale now, the regular price is 68,90 kn =)
.


 Salvation Palette - Colour Chaos contains 18 shades, 7 matte and 11 shimmers. 
It contains awesome combination of brights, acid neons and some neutrals!! 


It comes in a nice carton case that contains palette itself.
The palette comes in a a sleek, black, glossy plastic case , it closes nicely and it gave me a filing of quality and non breakable packaging, suitable for traveling!! 
On the inside of the lid is a large mirror and you also get a two side applicator!!

A lot of bloggers compares this palette to Urban Decay Electric one, and although I don't own UD I can tell from the pictures bellow that Colour Chaos has all the same shades as the UD plus 6 more!!


Ok so onto the actual shadows. They are all super pigmented and really nice. A little touch with your brush is all you need to pick up enough colorThey blend in really nicely with not so much fall out. To be honest I was surprised by the quality of the single eye shadows!! 


The first row contains  GLEAM, WKD, TOM TOM, PINK OBSESSED, ON A MISSION and OVER-BORED (all shimmers)


 Second row: NEEDED TO..., ME THREE, DO IT NOW.., TOXI APPLE-TINI, AMMUNITION, DELIVER ME (all shimmers)


Third row consist of 6 matte shades: SUPER Y, MY DEMONS, TIP X,  I SAID GO!, BEYOND REAL and CALM ME DOWN this one matches my skin tone perfectly so it's a bit harder to notice it on the swatches =)


Overall this palette is really bold, and it may not be everyones cup of tea BUT there's always an occasion where you need a bright eye look so I would definitely recommend you this one because it's a great payoff for the low price and it does have some more neutral shades that are perfect for everyday use!!
For me personally this is a perfect palette because when I put makeup I like it to be vibrant and also I have few neutral shades here that I can use when I don't feel like having something that bold on my eyes!!

I've done one look (so far) using just the shadows from this palette ..


 And that's it =) Do you like this palette and the look I created with it?

Don't forget to find  me on Bloglovin', InstagramFacebook and Twitter  

till the next time xoxo 


Wednesday, October 29, 2014

Matching Manicures - RED!!

Hello guys, hope you're doing great =) Although Sunday is the day for Matching Manicures post, I'm a bit late for this one so I'm doing it today!! First I taught I'll past this RED assignment because I'm not really a red nail polish person but then I've been organizing  my polish racks yesterday and I realize I have the most amazing red color so I just had to use it and do this post :D

The red polish I'm talking about is Burning Embers by Northern Star Polish and I did REVIEW while back about it.. I also used it in my Little Mermaid nail art because I taught it look perfect for Ariel's hair ;)

So here's is todays simple look :


I've used chevron stickers from bps (REVIEW) and Kiko nail lacquer in black!
This design reminds me a little of Dracula and his teeth ... it's a bit Vampy in my opinion!


I also did a matte version of this design just adding my O.P.I Matte Top Coat, and I kinda prefer this one =)


How do you like my red/black design? Do you think it's Halloween appropriate? Let me know in the comments bellow 

You can also find  me on Bloglovin', InstagramFacebook and Twitter 

You can check out what other girls did here :

Till the next time xoxo


Tuesday, October 28, 2014

Halloween nail art #2 - CRAZY PUMPKINS :D

Hello my friends, I'm back after some time. I graduated from college (pharmacy) so I was bit busy with that, but now I have more time for my hobbies at least until I found a job :)

I've done another  Halloween nail art although I don't really celebrate the Halloween I've got some amazing glow in the dark polishes (REVIEW) that are perfect for this type of manicures, and that's why I do them lol!!


First I've painted my nails black, I've used Kiko nail lacquer number 819 (REVIEW)  


Then I've made a pumpkins with orange polish - Where Did Suzis Man-go? by O.P.I (REVIEW) using the brush that comes with the polish (2 strokes)


 After that I started to paint details such as mouth, eyes, nose, teeth etc. For this part I've used black acrylic paint because my black striper dried out :/ 
You can do what ever you want to decorate the pumpkins!
At the end I applied Glow Blaze - orange glow in the dark nail polish by Parrot Polish but just on the pumpkins so they look more interesting in the night :D


And that's my Crazy Pumpkins nail art idea for Halloween. I hope you liked it and if you have any questions or anything fell free to leave me a comment :D

You can also find  me on Bloglovin', InstagramFacebook and Twitter

till the next time xoxo  


Sunday, October 19, 2014

Ruffian nails - BREST CANCER AWARENESS!!

Hello my friends , hope you're having an amazing weekend =)
It's Sunday and that means it's time for another matching manicure post =))
Today's assignment was to do a ruffian nails. This is such an easy design and I must say my first time doing it =))


I didn't use any kind of stickers or tips to create this just my hands and some nail polish :D


The polishes I've used:

MY SIGNATURE IS "DC" by O.P.I - silver (REVIEW)
FIJI by Essie - light pink

There's not much philosophy around this manicure it's really simple and the only thing you need is steady hand and some nail polish. Or if you don't have steady hand use french tip stickers and that's it =))


Let me know what you think about this design and colors I've chose for it in the comments bellow =) I love to read your opinion :D <3

with flash 
You can also find  me on Bloglovin', InstagramFacebook and Twitter 

If you want to know what other girls did, click on the links bellow:

Thank you for reading, till the next time xoxo

Tuesday, October 14, 2014

Easy Halloween nail art tutorial #1

Hy guys hope your doing great!
As you probably know, if you follow my blog, I've recently received some glow in the dark polishes  and top coats. The timing of their arrival couldn't be more perfect, since they're perfect for Halloween nail art.
So I did one (so far) using Glow Blaze (REVIEW), vibrant orange in the day and glowing orange in the night :D and it's inspired by Miss ladyfinger! You can use regular orange polish or some other color but glow in the dark makes it special!!


Here is a step by step tutorial:


1 After painting my nails Glow Blaze (review) I've added a dot with my biggest dotting tool using regular black polish
2 I've added second dot, this time a bit smaller then the first one
3 & 4 I've added 4 pairs of legs using black nail art polish ( the one with the striper) and that was it!!!

So easy but yet so effective !!


Did you liked it?  :D and let me know in case you try it :*

You can also find  me on Bloglovin', InstagramFacebook and Twitter  
  
 till the next time xoxo


Monday, October 13, 2014

Easy nail art step by step tutorial

Hello guys!! Hope you had a great weekend =)
I think it's about time for me to write another nail art post. This time I'm gonna show you one of the quickest and easiest designs I've done so far.
For this design you won't be needing any particular nail art tools or skills. The only things you will be needing are some nail polish and a toothpick!!


To be honest, I wasn't inspired by anything or anyone for this design. It's a product of my laziness actually lol . One day I was thinking how I should do my nails, but I wasn't in the mood for something complicated and I didn't had time for that! So I taught I'll just paint them in one color, no nail art, and that's it.
But when I started to paint them I tought I should try to do some kind of swirls with a toothpick and see how it come out!!
So I did and I quite liked it, so I decided to do it on my other nails and make a tutorial out of it =D


The blue polish I've used on my thumb, index and pinky finger is I SAW...U SAW...WE SAW... WARSAW by O.P.I. This one is from their Spring 2013 Euro Central collection, but I bought it just recently for 50% of in Sephora!! I bought most of my O.P.I's on some kind of discounts or on eBay where they're like 30-40% cheaper than in my local stores (new collections)!
And I added some nail studs for Born Pretty Store (REVIEW), if you don't have anything similar, you can ad some dots or just one or leave it as it is!

I painted my middle and ring finger white, I've used Essie's Blanc and I leave it to dry almost completely!
After that I've put random dots (using the nail polish brush), over the white base. It's not important how the dots look at this point, they don't have to be perfect or anything like that!
For the dots I've used :
 I SAW...U SAW...WE SAW... WARSAW by O.P.I. (dark blue)
HE BLUE IT THIS TIME! by O.P.I (middle blue)
CRUSH by GOTHIC GALA LACQUERS   (light/pastel/baby blue) - REVIEW 
You can use any colors you like. I decided to go with 3 different shades of blue!

As soon as I've finished making a random dots, I took toothpick and just made a swirling movements combining the dots. I've continued to do this until I was satisfied with the results.
At the end I just added some top coat ( Essie's Good To Go!) and that was it :D


 This is actually the design I've mentioned in my last post about glow in the dark polishes. I've applied Glow Blue top coat over it and came out with this :


 I love, love, love these glow in the dark top coats, they're absolutely stunning :D
If you want to know more about them GO HERE!

I hope you liked this design as much as I did and you'll try it sometime (that would be awesome)

You can also find  me on Bloglovin', InstagramFacebook and Twitter  

Till the next time xoxo 

Friday, October 10, 2014

Glow in the dark nail polishes from Parrot Polish

Hello my friends, how are you doing?
I'm quite busy  writing and preparing my graduation thesis so I've neglected a bit my blog and fb page :/
I've found time to finally show you the most amazing polishes I own, and that's because they glow in the dark.
It's so cool and fun when I turn off the lights before going to sleep and realize that my nails glows  lol ... Kinda spooky also lol
I have 6 polishes to show you today, 2 of those are regular glow polishes and 4 of them are top coats!! They are all from Parrot Polish, indie polish brand that I talked so much in the past few months. If you want to know more about them you can read my previous reviews!


They are absolutely stunning!


GLOW YUK - is supposed to be a glow in the dark version of neon green called Mr. Yuk - my all time favorite polish  (REVIEW). The formula is great, I applied two coats over white, but it's not so neon as the original one and it dries in a semi-mat finish. I don't think that's a negative thing because the color is still vibrant and so pretty <3
In the photo bellow you can see the Glow Yuk on the left and the original Mr. Yuk on the right. They're both taken in the daylight!!


Now let me show you how it looks in the night ;D


As you can see, the glow is really intense and it's even more equal and vibrant in real life. Absolutely gorgeous!!

GLOW BLAZE - is another improved version of his neon ancestor! The formula is the same as for the non glow one, but the color is again less neon then for the original one, (REVIEWand it dries in a semi-mat finish. 
On the photo bellow, the glow blaze in on the left and the original one is on the right!  


When you turn off the lights it has orange glow perfect for fall and especially for Halloween!


Now let's get onto the top coats! 
First the idea of making the glow in the dark top coat is (I think) brilliant! I didn't see this tipes of polishes anywhere else. The thing that makes them extraordinary is the fact that they can be put over any other color or design that you prefer on wearing during the day and still it makes your manicure glow during the night! So if you don't like the colors of some glow in the dark polishes, these are perfect for you!!

They came in a Green, Blue, Purple  and Bleen (blue-green) for now but I know there are some other colors that are being developed :D If you want to know what colors there are and when they coming out make sure you follow Parrot Polish on Facebook because they post new stuff there!!

First one I'm gonna show you is GLOW GREEN - this top coat has the most intense green glow with only one coat!! I've put it over my Paris themed nail wraps and if you've read REVIEW for those then you saw the photos of this amazing top coat! This is the proof that they can be put over anything and still glow amazingly!!


 GLOW PURPLE- another amazing top coat that gave me trouble while photographing it! It keep turning more blue that purple on the camera and I couldn't capture it's real color :( 
I was so sad because the color is beautiful and so unique! But anyways , the formula is great, only one coat is needed to make it glow! Dries fast as all the others do! 
I put one coat over the color of the year - RADIANT ORCHID, this polish is by Manhattan and it's number 26S!


GLOW BLEEN - is a light blue top coat with a hint of green, sort of a turquoise color! Formula, again, great, fast dry and only one coat needed for the effect!! I've put one coat over holographic color called  EMERALD SAND! (REVIEW)


you can still see the spectraflair from the holographic base - so cool


And last but not least is mini Glow Blue- another amazing top coat, with great formula. I applied it over a nail art that I'll show you in another post , but here's how it looks with the lights off :D


And there they are - 6 amazing glow in the dark polishes!!! I love the formula and how amazing they look!! I definitely recommend them to anyone who likes nail polish and nail art, they're must haves! 
You can get them HERE for $11 and FREE SHIPPING, I think that's a great deal!!

Don't forget to find me on InstagramBloglovinTwitter and Facebook   

TILL THE NEXT TIME XOXO