Search This Blog

Showing posts with label easy nail art for beginners. Show all posts

Sunday, July 26, 2015

MMS - Glitter Sandwich Manicure

Pozdrav noktoljupci =) Kako ste mi danas?
Ovotjedna tema za Matching Manicure Sunday je gliter sendvić manikura :D
Evo kako sam ju ja izvela...

Hello my nail lovers =) How are you today?
This week's theme for Matching Manicure Sunday is glitter sandwich manicure :D
And this is how I did it...


za ovu manikuru sam koristila / For this design I've used :
  • China Glaze - Dare To Be Bare
  • Let it glitter! - Oh Wow!
  • Essie - Good To Go - top coat


Prvo sam nalakirala jedan sloj Dare To Be Bare. Kad se osušio stavila sam Oh wow! šljokice i to sam radila kao neki gradijent!
Dodala sam još jedan sloj Dare To Be Bare i na kraju nadlak!
I to je to... stvarno jednostavna a baš lijepa i efektna manikura.
Ako niste toplo vam preporučam da ju probate =)

First I painted a coat of Dare To Be Bare. When that dried I added Oh wow! glitters, I did sort of a gradient with them!
I added another coat of Dare To Be Bare and a top coat and that was it!
This is really easy to do and it's still really pretty and effective.
I highly recommend you to try this manicure if you haven't already =)


Ovo je prvi put da radim sendvić manikuru i baš mi se sviđa kako je ispalo :D
Što vi mislite? Dali vam se sviđa?

This is the first time I'm doing sandwich manicure and I'm really happy how it turned out :D
What do you think? Do you like it?

Hvala na čitanju =) / Thank you for reading =)
You can find me also on  

Pogledajte što su druge cure napravile / check out what other girls did:
  

Saturday, February 21, 2015

Welcome spring nail art =)


Hello nail lovers =) How are you today?
Although the calendar says we have to wait another month for spring to come, these past few days were like spring is already come to my town. It was beautiful sunny weather that drown me into doing some floral nail art =)
I have 2 easy, dotticure designs to show you today so let's get started :D 


Pozdrav noktoljkupci =) kako ste mi danas?
Iako kalendar govori da ćemo na proljeće čekati još mjesec dana, ovih par dana je u mom gradu bilo predivno sunčano vrijeme koje me ponukalo da napravim cvjetnu manikuru =) 
Imam vam za pokazati dvije lagane, točkaste manikure , pa krenimo :D


This manicure was inspired by Spring Bouquet Collection by Paint Shop Polish that I reviewed last weak!
Polishes are simply gorgeous and perfect for spring!
As I already mentioned I did the flowers with dotting tool, it's super easy!
I just put 5 little dots for the flower and then one in the middle ( silver )!


 Ova je manikura inspirirana kolekcijom koju sam recenzirala prošli tjedan - Spring Bouquet, Paint Shop Polish-a!
Ti lakovi su mi predivni i savršeni za proljeće!
Kako sam i prije spomenula, cvijetići su napravljeni sa točkalicom, to je stvarno lako!
Samo sam napravila pet točkica u krug i jednu u sredinu (srebrnu ) i cvjetić je tu!
 

I've used / Koristila sam :

Daisy, Hyacinth and Tulip by Paint Shop Polish (REVIEW)

Alpine Snow and My Signature Is DC by O.P.I (REVIEW)

Good To Go by Essie (Top Coat)

Small dotting tool / malenu točkalicu 

I also added Essence by Parrot Polish over and here are the results ...
Stavila sam i Essence od Parrot Polish-a preko ove manikure i evo što sam dobila ...


And now the second one... 

A sada manikura br 2 ....


I did this design a while back but just didn't post it till now... This one is bit more serious!

Ovu sam manikuru napravila pred dosta vremena ali nikako da ju objavim.. Malo je ozbiljnija!

I've used / Koristila sam:

Ski Teal We Drop, Alpine Snow and My Signature Is DC by O.P.I 

Dotting tool / točkalicu


So what do you think? Witch one you prefer?

I što mislite? Koja vam je bolja?


Thank you for reading, don't forget to find me on
 Till the next time xoxo  

Hvala na čitanju, ne zaboravite me naći i na
Do slijedećeg puta xoxo 


Monday, February 2, 2015

MMS - Tape Manicure

Hello my nail lovers, hope you're doing great =) 
I'm a day late on this week's Matching Manicure Sunday but better late then never, right? =)
I want to take this opportunity to congratulate once again to the winners of my first giveaway ever 
Sanela ( inSanenails) and Diana ( dutch-diana ) :D
Now let's get down to this week's theme - tape manicure =)
This is what I came up with...

Pozdrav noktoljupci, nadam se da ste dobro =)
Kasnim dan sa ovotjednim MMS-om, ali bolje ikad nego nikad, zar ne? =)
Željela bih iskoristiti ovu priliku da još jednom čestitam dobitnicama mojeg prvog darivanja 
Saneli ( inSanenails) i Diani ( dutch-diana ) :D
A sada ovotjedna tema - manikura sa trakom =)
Evo što sam ja napravila...


I kinda got sick of all the dark winter color so I did this colorful design perfect for the Carnival season that's going on in my country =)

Dosadile su mi sve one tamne zimske boje, pa sam napravila ovu šarenu manikuru idealnu za ovo maškarano doba =)


I didn't applied top coat because I did something over this design, but you'll see that in my next post so if you're interested  make sure you follow my blog :)

Nisam nanijela top coat jer sam napravila još nešto iznad ove manikure, ali to ćete vidjeti u mom sljedećem postu, tako da ako vas zanima pratite moj blog da vam ne promakne :)


I painted my nails 2 coats of white polish then after it dried I applied the tape.
I took small peaces of makeup sponge and dabbed all the colors you see and that was it!

Prvo sam nanijela 2 sloja bijelog laka, kada se osušio naljepila sam trakice.
Uzela sam male komadiće makeup spužve i tapkala boje koje vidite i to je bilo to =)


 So what do you think?
I kako vam se čini?

Thank you for reading, don't forget to find me on
 Till the next time xoxo  


Hvala na čitanju, ne zaboravite me naći i na


Do slijedećeg puta xoxo  

Check out what other girls did / Pogledajte što su ostale cure napravile :


Monday, January 26, 2015

Bubbly nail art =)

Hello my nail art lovers, how are you today?
I have a cold so I'm not so good, but I'm hoping I'll get better soon!

Pozdrav dragi noktoljupci, kako ste mi danas?
Ja sam pokupila neku prehladu pa i nisam nešto, ali se nadam da ću brzo ozdraviti!

Today I'll show you one easy but very interesting design that I've tried  few days ago but didn't have time to write about it!!

Danas ću vam pokazati jednu laganu ali jako interesantnu manikuru koju sam isprobala prije nekoliko dana ali nisam imala vremena pisati o njoj!!


I did 2 versions, one with the white frame other with silver!

Napravila sam 2 verzije, jednu sa bijelim jednu sa srebrnim rubom!


How I did it: / Kako sam to napravila:

I had 2 coats Always On My Mint by Essence (REVIEW) as a base, but you can use simple white polish!
Then I took peaces of alluminium foil and I put few drops of polish remover on it (you can use some kind of a plastic holder too, same thing on witch you would put polish when you're doing dots)! 
After the remover I put few drops of nail polish (color of your choice) and mixed them together, this step is important to dilute the polish a bit!
Then I took a Q-tip and dipped it into the diluted polish and did dots with it.... and the bubbly effect was here!! =)

Imala sam 2 sloja Essence-ovog Always On My Mint (RECENZIJA) kao bazu, ali možete koristiti i bijeli lak!
Onda sam na komadiće aluminijske folije stavila par kapi odstranjivača laka za nokte (možete koristiti i neku plastičnu posudicu umjesto folije, isto ono što koristite kad radite točkice) te par kapi laka za nokte ( boja po izboru)!
Izmiješala sam ih kako bi se lak malo razrijedio i onda sam sa štapićima za uho radila točke na noktima ... i efekt balonića je bio tu!! =)


 So what do you think? Would you try it?
Do you like the one with the white or silver frame better?

I što mislite? Biste li ju probali? 
Da li vam se sviđa više ova s bijelim ili srebrnim rubom?
Thank you for reading, don't forget to find me on
 Till the next time xoxo  

Hvala na čitanju, ne zaboravite me naći i na
Do slijedećeg puta xoxo  


Sunday, December 7, 2014

MMS - Cartoon

Hello my friends, how are you? 
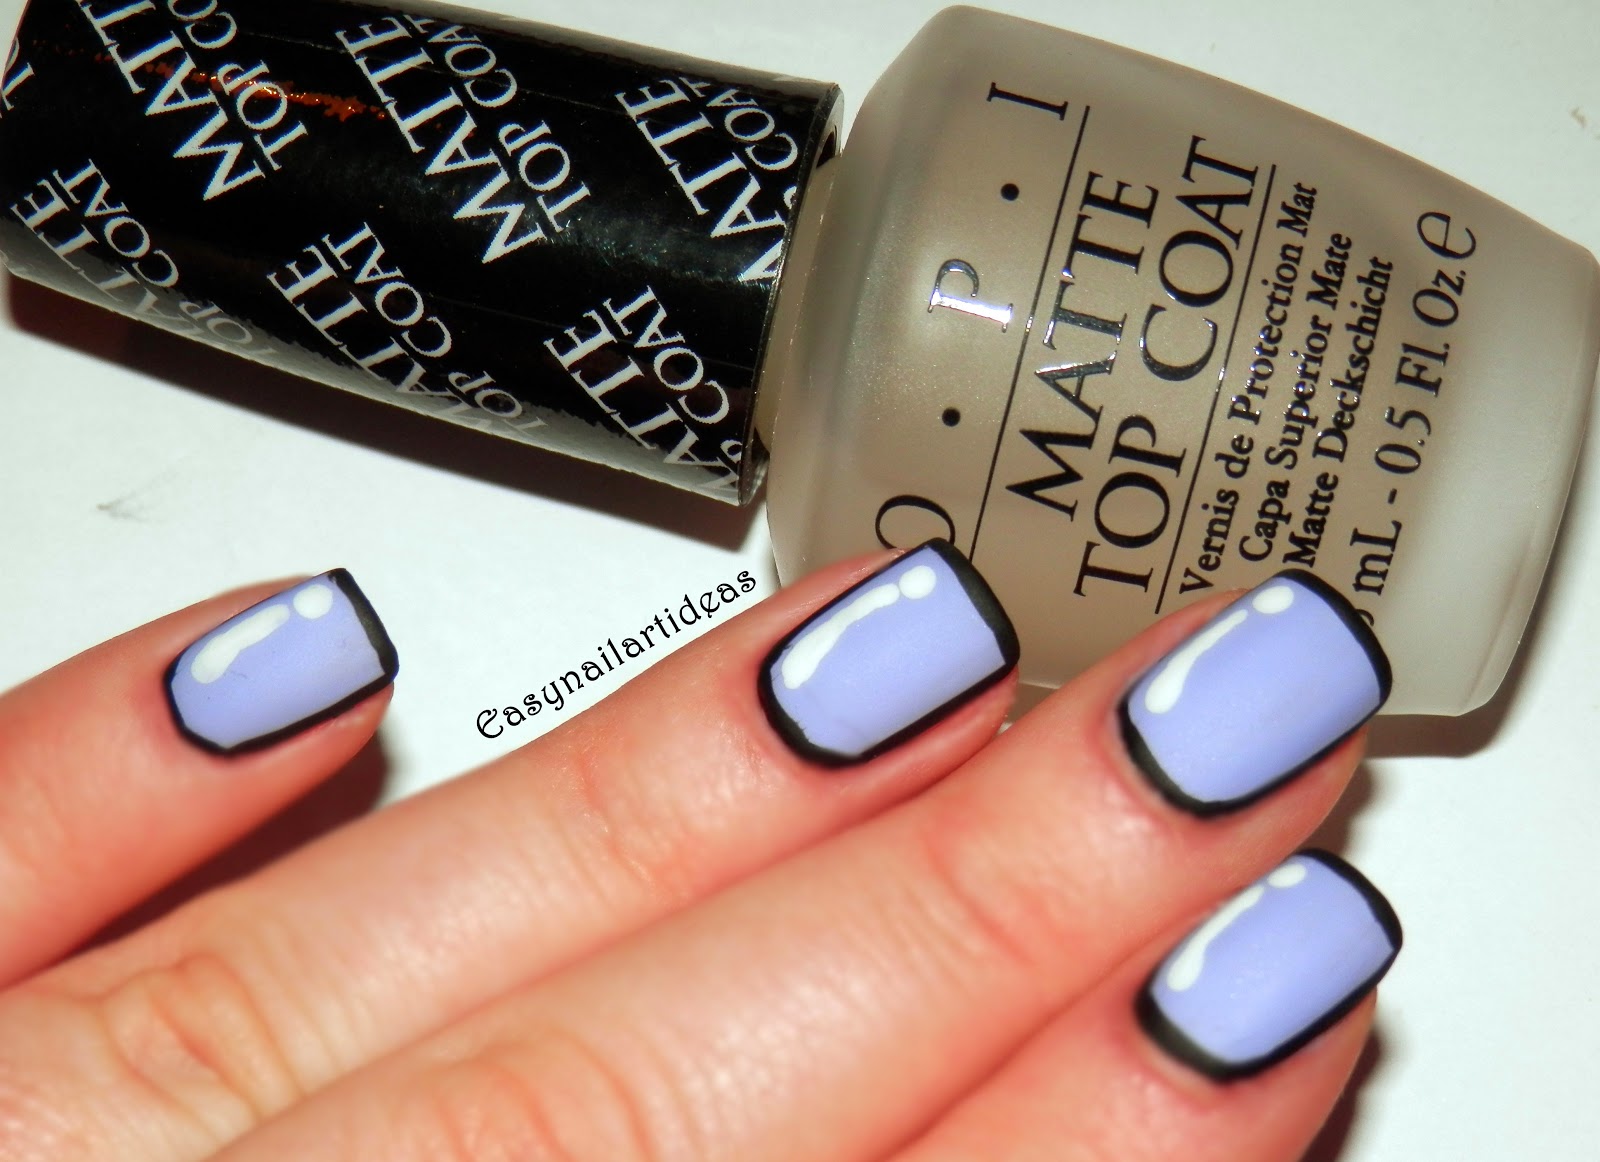
Today's assignment for the Matching Manicure Sunday is cartoon nail art, so I decided to recreate one that I first saw on cutepolish's channel!

 To be honest, I taught the assignment for this Sunday is something else and that's why I did this  easy and quick design (I didn't have enough time today to do something "better"). 


For this design I've used:

O.P.I - You're Such A Budapest 
O.P.I - Alpine Snow
Kiko - Black
Essie -  Good To Go Top Coat 
O.P.I - Matte Top Coat


First I've applied 4 coats of You're Such A Budapest, yep you'll need 3 to 4 coats for reach full opacity and to even things out. The formula is so watery and this is the only O.P.I polish that I've tried and don't like! I've bought it because the color is pretty and a LOT of bloggers and nail artist praised about it and recommended it,but it's really bad, at least for my taste :/
This is just second time I've used it, and I have it for months!! 
 Then I've done the black frame with Kiko black polish and striping brush, after that I've added white dot and stripe with dotting tool! 
I've put Essie's good to go first because my Matte top coat tends to smudge my art :/
Minute and few photos latter I added matte top coat and that was it =) 

Here's few shiny photos :


 And Matte ones:


And that's it =) What do you guys think? 
I like the way it looks on the nails :D

Thank you for reading, don't forget to find me on

 till the next time xoxo 

You can check out what other girls did here:

Tuesday, November 18, 2014

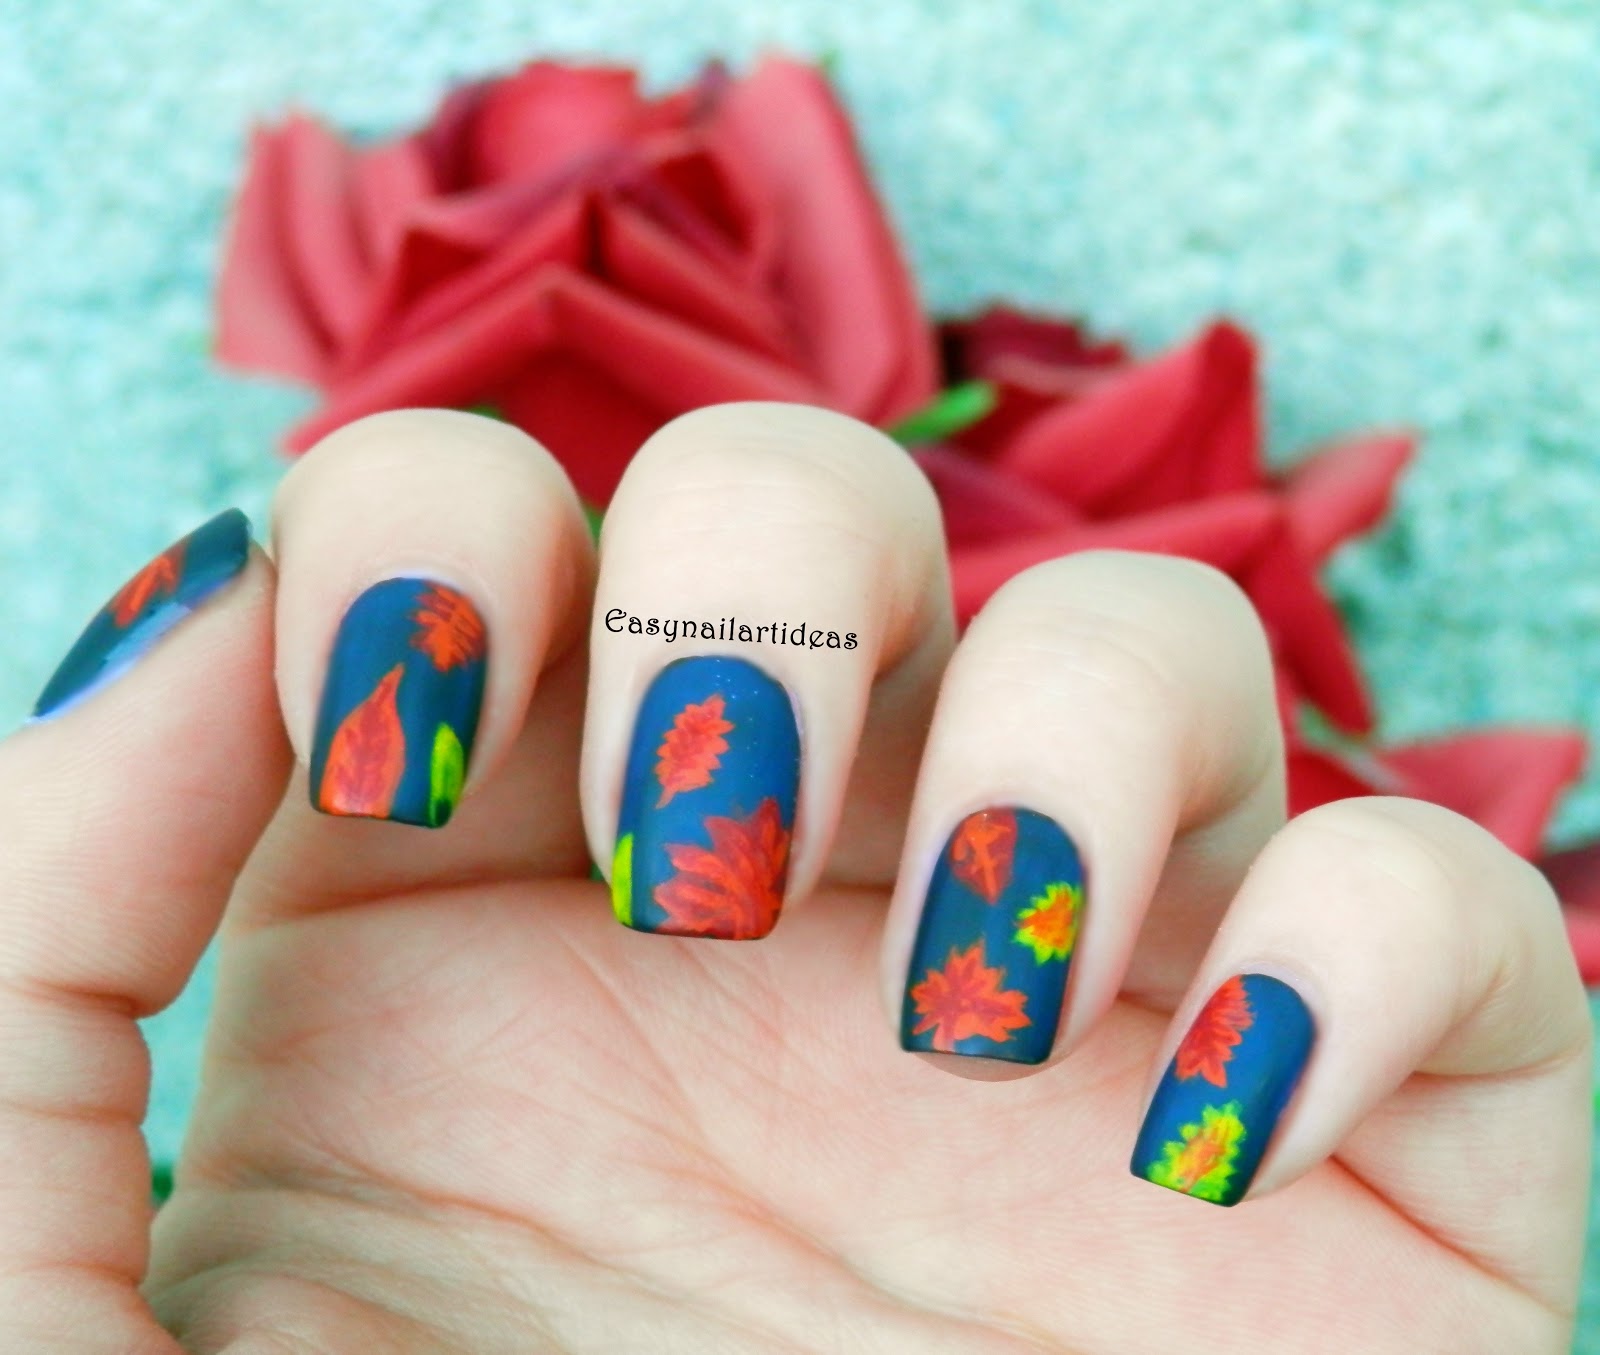
LEAVES MATTE NAIL ART

Although there are a lot of winter manis out there I'm still in my fall mood so today, I'm gonna show you another fall themed nail art.


For the base I've used Vino tinto ( italian for dyed wine)  by Catrice, it's actually dark brownish polish with burgundy/red undertone, in pictures is more dark blue, idk why :/ 
I think it can be good alternative to black polish if you want dark nails but doesn't really like black look! 

For the leaves I've used acrylic paint because it's a lot more easier to clean brushes afterwards than when using polish!

I love the roses in the background =) do you?

 This is a nail art that requests a bit more time and patience, but still its not so hard that requests any special skills!!


 I almost forgot to mention that I've used O.P.I's Matte Top coat for this look!

What do you think? Did you like it?

Thank you for reading, don't forget to find me on

Till the next time xoxo    


Saturday, November 1, 2014

MMS - Halloween

The theme for this weeks Matching Manicure Sunday is Halloween! 
I  did 3 designs so far that can be used for Halloween ( FIRST, SECOND, THIRD) and I saved my favorite for last =)

 I've already posted the photos of this design on my INSTAGRAM and FACEBOOK PAGE accounts because I was so happy how it turned out and I couldn't wait lol. But I wanted this particular design to be a part of MMS so I'm publishing the blog post now!

The design I'm talking about is Mr Frankenstein inspired nail art that glows in the dark :D


For this design I used :
O.P.I - Alpine Snow as a base
Parrot Polish - Glow Yuk, 2 coats (REVIEW)
Black acrylic paint 
Nail art brush
Dotting tool (for the eyes)

This was probably the quickest Halloween design I did this year. It really takes minimum skills and time but the results are in my opinion stunning, especially in the dark!!
I highly recommend this glow in the dark polish, there's also other colors to chose from and Parrot Polish also offers glow in the dark top coats that can be applied on any other polish or nail art without changing the color of it!! The best part is that they offer FREE WORLDWIDE SHIPPING, I think that's amazing because Indie polish brands usually have such high shipping costs that makes buying practically impossible for many international ladies including myself!!


 So what do you guys think? Do you like this one as much as I do? Or you have some other favorite? 


Here's a little collage of all the 4 designs :D 

Thank you for reading my blog, hope you'll continue to do that in the future :D

Don't forget to find  me on Bloglovin', Instagram, Facebook and Twitter

Check out what other girls did on the links bellow:   

till the next time xoxo  

Tuesday, October 28, 2014

Halloween nail art #2 - CRAZY PUMPKINS :D

Hello my friends, I'm back after some time. I graduated from college (pharmacy) so I was bit busy with that, but now I have more time for my hobbies at least until I found a job :)

I've done another  Halloween nail art although I don't really celebrate the Halloween I've got some amazing glow in the dark polishes (REVIEW) that are perfect for this type of manicures, and that's why I do them lol!!


First I've painted my nails black, I've used Kiko nail lacquer number 819 (REVIEW)  


Then I've made a pumpkins with orange polish - Where Did Suzis Man-go? by O.P.I (REVIEW) using the brush that comes with the polish (2 strokes)


 After that I started to paint details such as mouth, eyes, nose, teeth etc. For this part I've used black acrylic paint because my black striper dried out :/ 
You can do what ever you want to decorate the pumpkins!
At the end I applied Glow Blaze - orange glow in the dark nail polish by Parrot Polish but just on the pumpkins so they look more interesting in the night :D


And that's my Crazy Pumpkins nail art idea for Halloween. I hope you liked it and if you have any questions or anything fell free to leave me a comment :D

You can also find  me on Bloglovin', Instagram, Facebook and Twitter

till the next time xoxo