Search This Blog

Saturday, March 29, 2014

Essie Hide and Go Chic spring 2014 - FASHION PLAYGROUND

Hi guys! Hope you all are having a nice weekend, mine is pretty good so far! Tonight, I'm finally getting out with my friends after pretty long time =) I'm so excited about that!
Today I have one polish from Essie's new spring collection to share with you. This collection has 6 polishes in beautiful spring shades. I really like it, but unfortunately couldn't afford to buy whole collection. The one polish that I liked the most (on pictures) is FASHION PLAYGROUND! 

ESSIE describes this one : "fun and games just met their match. this plucky pistachio green with subtle shimmer flirts with forever and plays for keeps."  

FOR ME : It's a springy pastel shade of mint (pistachio) green that I'm absolutely in love with. It has that really subtle shimmer that so many of Essie's recent releases have had, but it's pretty difficult to see unless you have really good light or you're at a really good angle.
I was looking for perfect mint nail polish for months. I was thinking about buying China Glaze RE-fresh mint but when I saw this one from Essie I decided to try it.
Well I was wrong!! (unfortunately) Let me tell you why...
Although  the color is perfect the application is really hard! First dislike is the brush- it's small, it's not that wide and flat brush that all of my Essie's have. The weird brush did make application kind of challenging, but not nearly as much as the formula did.I thought it was really thick.The first coat was disappointingly streaky.  So was the second.The third evened everything out decently, but it still didn't look perfect. =(
So I'm pretty disappointed with this polish and I think brand like Essie shouldn't allow this kind of formulas happen to them. I don't think we deserve it for the prize we pay!! I was really set down by this so I don't think I'll be buying more Essie's any time soon =(
I wish I saw a review like this before I went and purchase this polish =(


Here's some pictures :


To conclude : I wouldn't recommend anyone to spend money on this one, the formula is just not worth it!!


Wednesday, March 26, 2014

My (small) Essie collection

Hi guys, I'm really excited about todays post. Today I have for you swatches and reviews of my entire Essie collection .. you probably go wow - the entire collection .. well I must tell you right away it's really small one :D
Although my Essie collection is really small (I own only 5 polishes + one nail treatment), I'm really happy to have it.
Since Essie polishes are pretty expensive in my country it's not really possible for me to have all of the colors that I would won't , witch sucks  :/ but it is what it is.

All of the colors you'll see down bellow were purchased by me (on discount :D ) and aren't anyway sponsored by anyone (except me lol)

so let's get started =)

First one I have to show you is the color that I think every nail lover should have in their collection ( from any brand you prefer). It's the good old WHITE polish, this one is called Blanc.


I don't have to tell you much about the color, but I do have to tell you about the formula.
The formula on this one is not the best one.. It's a bit thick and streaky and a little chalky , so I cannot say I'm completely satisfied with it, but it's manageable . I use a white polish mostly as a base for my nail art so at the end you don't really see that it's not perfect .
to conclude : I wouldn't recommend you to buy this one for the full price, but if you can get it 50% off like I did , then go for it =) 


The second polish of my collection is another cream one. It's called FLAWLESS . I bought this one the same day as I bought Blanc and these 2 where my very first Essie nail polishes =)
Unlike the blanc this one has great formula and it's such a pretty candy pink color. If you're looking for the true girly pink nail polish then this one is right for you... or as the name would say it's flawless =)


The third one is my absolute favorite of my entire (small) collection =) 
It's LILACISM I'm sure many of you herd about this color already because it's been very popular since it came out in spring 2013. Now I know why...The formula is great, it's fully opaque in 2 coats and it's perfect lavender color .
Overall, I am extremely happy with this nail polish! The shade is to die for and the formula is outstanding! If you like pastel nail polishes I definitely recommend you check Lilacism out!  


The other two I'm gonna show you are shimmers =)

First one is THE LACE IS ON pink toned purple shimmer . It came out with the fall collections of 2013.
This polish has an amazing formula opaque even with only one coat and extremely easy to apply. I was in love with this polish since I first swatch it.
  
 this is one coat


  two coats no top coat


The last but not the least is TROPHY WIFE the perfect deep teal pearl polish. It's not a opaque as THE LACE IS ON but it still gets fully opaque in 2 coats.. Formula is good and if you're a fan of green, teal, mermaid colors than you should definitely check this one out =)


 As probably many of you know the Essie has really good formula on most of their polishes,  the amazing medium-sized brush allows you great control over the application and they last for days without chipping ..

All of the swatches you saw where 2 coats and no top coat.

so, what do you think about my collection? do you like or own any of the colors? 

Saturday, March 22, 2014

Collaboration and tutorial

Hi guys, few weeks ago my friend Monica suggested me a collaboration. Without even thinking I said YES!!
The idea of doing a collaboration with such a great nail artist like Monica was so exiting but also challenging. We didn't have to think too much to select a theme ..
We both agree that it have to be CHERRY BLOSSOM =). The perfect design for beginning of spring.

So these are our finished manicure =) As you can see they are very much different. I based my design more on the branches with little flowers while Monica has focused more on the beautiful cherry flowers =)

 To see Monica's other great designs check her fb page Moni's Mani and to read her post about our collaboration you can check her blog : http://monismani.wordpress.com/

Now it's time to show you how I did it :

1. I painted my nails base color, I used essie -Blanc ( you can use any white polish you have)


2. I put a light blue polish on the make-up sponge, that I dabbed into my nail to create an ombre effect ... you can use any kind of sponge you have, or if you don't own them, they really cheep..


With this light blue- white ombre I tried to create something that looks like the sky in the background ...

3. I added some branches with black nail striper


4. With dotting tool I added two shades of pink dots that represents  flowers


5. I added some smaller black dots inside of the flowers, added top coat and that was it =)


I'm so happy that I did this collaboration and although this was the first one for me I'm sure it won't be the last ;)
I hope you liked this as much as I did and that the tutorial was helpful for you..
If you ever try any of my designs please send me your photos  because I would love to see them <3

Till the next post xoxo

Friday, March 21, 2014

NAIL ART IDEAS: Peacock feathers nails - step by step tutorial!

NAIL ART IDEAS: Peacock feathers nails - step by step tutorial!

NAIL ART IDEAS: Review - KIKO nail polishes

NAIL ART IDEAS: Review - KIKO nail polishes

Review - KIKO nail polishes

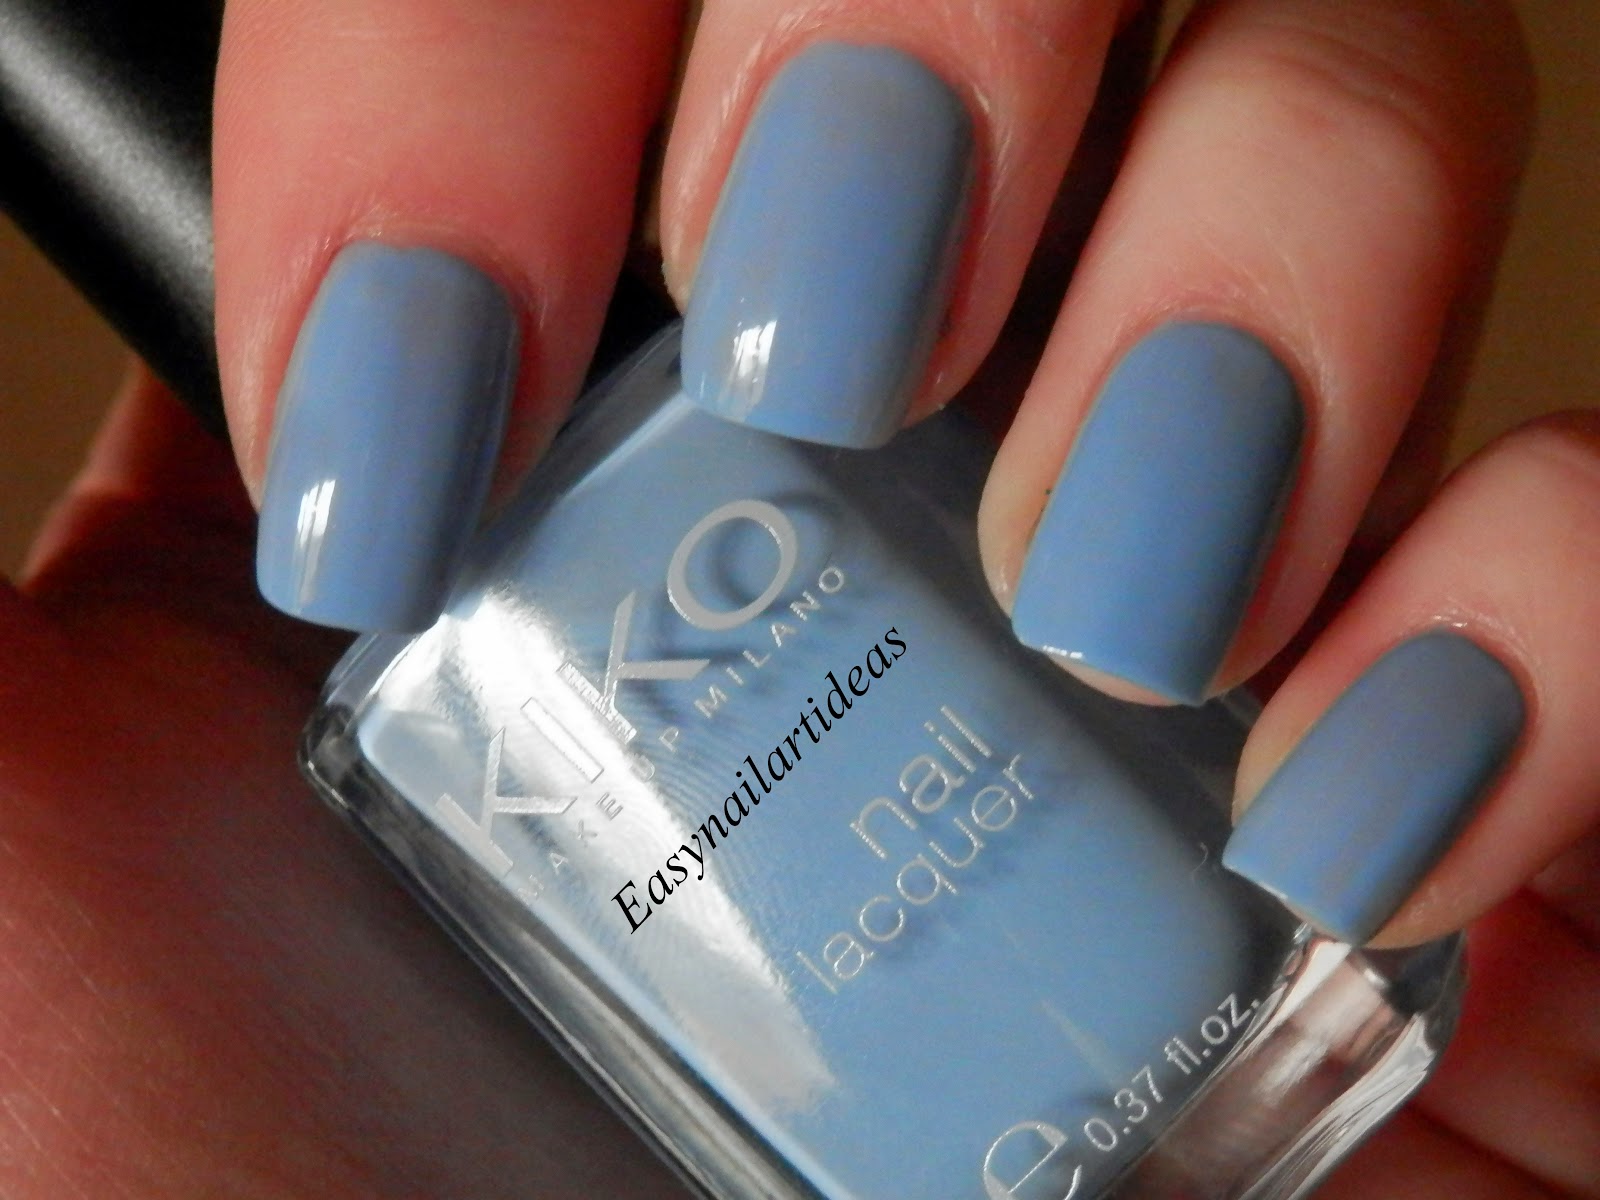
Hi guys! Today I have review of two Kiko nail polishes to share with you.
I bought this polishes couple weeks ago in Kiko cosmetic official store in Italy. Since I didn't own any of their polishes I really wonted to try some.
So I picked up two of them, one is the light blue color number 339 and the other is black number 819.  Although I saw some bloggers post names of Kiko polishes I just couldn't find names of this two on the bottle :/ ... after checking the Kiko official web site I found out the names =)

Number 339 named Cornflower is the color I really like. It's a lovely light blue color with a dash of purple. I think this color would look great on every skin tone.
So I was really excited about this one , but when I swatch it.... it was a nightmare =(
The formula is runny and it need like 3-4 coats to be fully opaque... That wouldn't be such a big problem if the drying time was decent . But NO (here comes the problem number 2) The 2 coats that I applied needed hours to completely dry :O
I didn't use any kind of fast dry drops , spray or top coat. I assume it would helped if I did.
But I don't think everyone have those thing so I wonted to see how will the polish behave itself . I was really,really disappointed because I really liked the color =(
I'm gonna show you picture of my swatch now :

  one coat


           two coats ( you can still see my natural nail)


The second polish I have to show you is number 819 - BLACK . This one is from their Quick dry line. The brush on this one is different than from the 339, its flat and bigger so it makes application a bit more easier. The formula on this one was pretty decent. It is a bit ticker but it goes on nicely. It was fully opaque in 2 coats (you can probably get away with just one) and it dried quickly , yay =))
At first sight it look almost perfect =)
The thing about this one is that after  2 days it started to peel of from my nails.
It didn't chip like polishes normally do but it peeled of in one piece :/  
It was just like this new O.P.I peel of base for glitters lol
Did any of you had that kind of experience with nail polish?? this was the first time for me :/


To conclude, I'm a bit disappointed  with this 2 I purchased, I don't know what's wrong with their formulas but something is very wrong. I know lot of you love this brand so I'm sorry but I have to say I don't =( .. I don't think I'm gonna buy Kiko polishes in the near future..
  
Did you try any of their polishes?  
What are your experience with Kiko brand, do you have any suggestions for me? 
feel free to leave me a comment and don't forget to follow me with GFC or Bloglovin'
Thank you for reading =) till the next time xoxo  

Friday, March 14, 2014

Peacock feathers nails - step by step tutorial!

Hello ladies, today I have for you tutorial of peacock feathers nails that is really simple to recreate =)

 I never really thought about doing this design until my friend Monica challenged me to do it .
After weeks already passed I decided to finally do them.

I looked on youtube for inspiration and I find a video from Simplenailartdesigns that helped me with my mani...

so let's get started...

first of all I painted my nails base color. In this case I used Trophy wife by essie


After that I used a black striper, (you can use any kind) to draw a line like so :


Next I did some lines to the left and to the right from the main one :


I added some lines in between :


then I added some bronze lines (you can add gold, brown or any other color you think it would be good in this case )


at this point , I draw a bronze oval like so ...


then I rounded it with black stripper :


after that I dipped my dotting tool in light blue polish


then I dip it in darker blue color and made a circle


And that's it I just added some top coat and my Peacock feathers design was done =)


So what do you think? Please let me know in the comments below =)

don't forget to follow me on Bloglovin  :* <3

Saturday, March 8, 2014

How to create a RAINBOW NAILS

 <a href="http://www.bloglovin.com/blog/11921005/?claim=ytyhg5r6u4k">Follow my blog with Bloglovin</a>

Hi guys! =)
Today I'm gonna show you my rainbow design and how to do it =)


 so let's get started...

First I painted my nail with the base color . I used Catrice polish named "Am I blue or green?"
I love that name.. this is a light blue color that has like a mint green undertone. it reminds me a lot of Essie's Mint candy apple ..


After my base color has dried, I painted my tips white so they look like the clouds =)
I didn't use any special tools to do that just the regular brush that came with the nail polish.

At this point I started to drag the lines with the colors of the rainbow =) I started with the red line, then continued with the orange, yellow, green, light blue and dark blue ( those are the colors you'll need).
 I used detail brush but it would be a lot more easier if you had nail art striper.


 continue adding other line under the previous until you don't use all of the colors...


Make sure to continue the line from the first nail to another, that way you'll get the design that looks like the rainbow, at the end =)

And this is the final look without top coat :


After my design has dried I added O.P.I 's Mat top coat ... and that's it =)


The polishes I used :

Catrice - Am I a blue or green? 
Essie -   Blanc 
O.P.I -    The spy who loved me , Where did Suzi's man-go?   and Matte top coat
Maybelline colorama- number 749 
Flormar supershine - green color that has no name or number
Kiko - number 339
Catrice - Shopping day at bluemingdales 


 I hope you liked this design and that you'll try it yourself =)

Fell free to leave a comment  and give me some suggestions and advice so I can improve my posts in the future ...

thank you for reading :*

Follow me on Bloglovin