Search This Blog

Sunday, December 14, 2014

MMS - Snowflakes / Pahulje

Hello my nail art lovers, I hope you've had a great weekend and you're ready for new Matching Manicure Sunday .... I am :D
Today's assignment are snowflakes and this is what I did ...

Pozdrav noktoljupci,  nadam se da vam je viken bio super i da ste spremni za još jednu Nedjelju usklađenih manikura... Ja jesam :D
Današnji zadatak su pahulje i evo što sam ja napravila ... 


I did more conventional blue/white snowflake mani for one of the previous MMS ( CHECK IT OUT HERE) I decided to do this one a bit more different with a red shimmery base and Rudolph - red nose Santa's reindeer as an accent :D 

S obzirom da sam za jedan od predhodnih MMS-a napravila recimo više konvencionalne plavo/bijele pahulje (POGLEDAJTE IH OVDJE
), odlučila sam sada napraviti nešto drugačije, sa crvenom svjetlucavom bazom i sobom Rudolfom! 


What did I use / Što sam koristila :

O.P.I - The Spy Who Loved Me (REVIEW / RECENZIJA) 

O.P.I - Alpine Snow  - base for the Rudolph / baza za Rudolfa

FLORMAR - M105 (brown / smeđi) - for the Rudolph's head / za Rudolfovu glavu

CATRICE -  Vino Tinto ( dark brown / tamno smeđi) - for the horns / za rogove

ESSENCE - white stamping polish for the snowflakes / bijeli lak za pečatiranje pahulja

KIKO - 819 black for the eyes / crni za oči (REVIEW / RECENZIJA) 

STAMPING PLATE QA19 from Born Pretty Store for the snowflakes / 
PLOČICA ZA PEČATIRANJE QA19 sa Born Pretty Store-a za pahulje (REVIEW / RECENZIJA)

DOTTING TOOL 


It's really easy to make Rudolph. Here's a quick step by step tutorial on how I did it.

Rudolfa je lako za napraviti. Evo jednog kratkog tutorijala koji prikazuje kako sam ga ja napravila.  

1 I painted the head with brush that comes with the polish. It's like painting your nails just starting from the middle.

Glavu sam napravila sa četkicom koja dođe  s lakom. Isto je kao da lakirate nokte samo počnete od sredine.

2 I painted the horns with striping brush.

Za rogove sam koristila tanki kistić za pruge. 

3  I added some eyes with the dotting tool, first I made a bigger white dots then smaller blacks inside of them. I did the nose with the same red polish as I did rest of the nails.

Dodala sam oči sa točkalicom, najprije malo veće bijele točkice zatim manje crne unutar njih. Nos sam napravila sa istom crvenom bojom sa kojom sam nalakirala ostatak noktiju.


 So what do you think? 
I love it lol

Kako vam se čini? 
meni je super lol 

Thank you for reading, don't forget to find me on

 Till the next time xoxo  

Hvala na čitanju, ne zaboravite me naći i na

Do slijedećeg puta xoxo  

 Check out what other girls did / pogledajte što su druge cure napravile : 

Friday, December 12, 2014

Santa nail art using water decals

Hello my nail art lovers :D , how are you today? Any snow in your countries? 
Yesterday I made another easy Christmas / Santa nail art that doesn't request any special nail art skills.

Pozdrav noktoljupci :D kako ste mi danas? Ima li što snijega kod vas?
Jučer sam napravila još jedan Božićno/zimski dizajn za kojeg vam ne trebaju nikakve posebne vještine, jako je jednostavan za napravit!


Of course it's a red - green combination, what else :D and it glows in the dark!!

Naravno, kombinacija je crveno - zelena, a ča drugo :D i svijetli u mrakuuuu!


What did I use / Što sam koristila:

RED is / CRVENI je ; Parrot Polish - Santa Glow  (review/recenzija)

GREEN is / ZELENI je ; Parrot Polish - Grinch Glow (review/recenzija)

GLITTERY TOP COAT is /  ŠLJOKIČASTI TOP COAT je ; Essence - Space Queen

and WATER DECALS / i VODENE NALJEPNICE 


 I love this polishes that glows in the dark, so amazing!!

Obožavam  ove lakove koji svijetle u mraku, zakon su!!
  

I've got this water decals from Born Pretty Store to review, and I can honestly say they're the best ones I've tried so far. I believe that's because they're made on a thin transparent foil that when applied on the nail stick perfectly and the edge of the decal is not even visible (you can see on the photo bellow). 
I've tried few different  water decals brands but they were all made on ticker foil and you have to press them hard, for like a minute or so, before it's applied on the nail and the line remains visible even after applying top coat (sometimes even 2 coats)!

Dobila sam ove naljepnice od  Born Pretty Store za recenziju, i mogu iskreno reći da su najbolje naljepnice koje sam do sada probala. Vjerujem da je to zbog toga što su rađene na tankoj prozirnoj foliji koja se, kada se aplicira na nokat savršeno zalijepi i rub naljepnice postaje skroz nevidljiv ( to se vidi i na slici ispod).
Probala sam nekoliko naljepnica i od drugih brendova ali sve su bile rađene na debljim folijama koje je trebalo stisnuti i držati tako cca minutu da bi se zalijepile za nokat i svejedno je rub ostao vidljiv pa čak i nakon top coata ( nekad i 2 sloja)!


This particular Christmas / Santa decals are BLE1763 and they're on the discount now for only 0,99$. They were 2,86$ when I got them! 
I didn't get only these ones because I've choose the entire sheet that has 11 patterns and its + $ 4,00 on the original price. So you can get 11 diferent patterns for $4,99 now! 
Don't forget about 10% discount code HE10K31 if you decide to buy anything!

Ove Djed / Božićne  naljepnice su BLE1763 i sada su na popustu za samo $0,99. Bile su 2,89$ kad sam ih ja odabrala!
Nisam uzela samo ove, već sam izabrala cijeli list na kojem ima 11 različitih uzoraka za dodatak od $ 4,00 na početnu cijenu. Tako da dobijete 11 uzoraka za $ 4,99 sad!
Ne zaboravite na kod za 10% popusta HE10K31 ako odlučite kupiti nešto!


 Thank you for reading, don't forget to find me on

 Till the next time xoxo  


Hvala na čitanju, ne zaboravite me naći i na

 Do sljedećeg puta xoxo


Thursday, December 11, 2014

O.P.I - The Spy Who Loved Me = The most gorgeous red polish / Najljepši crveni lak

 Today I wanted to share with you this polish that I have for over a year. It's The Spy Who Loved Me by O.P.I , released as a part of  holiday 2012. Skyfall collection.

Danas sam željela podijeliti sa vama jedan lak kojeg imam već više od godinu dana. Zove se The Spy Who Loved Me (špijun koji me volio) od O.P.I , dio je njihove blagdanske Skyfall kolekcije iz 2012.


Sorry for the white accent - but this is actually a base for my new nail art.

Ispričavam se za ovaj bijeli accent - ovo je zapravo baza za moj novi dizajn. 


The Spy Who Loved Me is bright red, packed with golden shimmer. The formula is great, reaches full opacity even with 1 coat, second coat builds up the shimmer but the color stays the same! Dries quickly and because of it's gorgeous shimmer this is my all time favorite holiday red!

The Spy Who Loved Me je jarko crveni lak sa zlatnim zrncima. Formula je odlična, kompletno prekriva već sa prvim slojem, sa drugim slojem se poveća svjetlucavost ali boja ostaje ista! Brzo se suši i zbog svog predivnog zlatnog svjetlucajućeg efekta postao je moj omiljeni blagdanski lak za nokte!


 what do you think about this polish? Do you own something similar?

Što mislite o ovom laku? Imate li neki sličan? 

Thank you for reading, don't forget to find me on

 Till the next time xoxo  


Hvala na čitanju, ne zaboravite me naći i na

 Do sljedećeg puta xoxo

Monday, December 8, 2014

Stamping plate QA19 review and nail art / Pločica za pečatiranje QA19, recenzija i nail art

Hello my dear nail art friends, I hope you're doing great =) 
Today I'll share with you a review of a Christmas  themed stamping plate that I've got from Born Pretty Store! 

Pozdrav moji dragi noktoljupci, nadam se da ste super =)
Danas ću podijeliti sa vama recenziju pločice za pečatiranje Božićne tematike, koju sam dobila sa Born Pretty Store-a!  


As you can see on the photo above, it has pretty much every design or image that's been usually done in this time of the year on our nails :D 
 Quality is great, I don't know if you ever tried any of the BPS plates but in my opinion they're in range with the MoYou London ones with much more acceptable price!
This one is on sale now and it retails for only 0,99$, it was $2,99 before!
Great deal!! (in my opinion)
 HERE is a direct link to it in case you're interested ;)

 Kao što možete vidjeti na slici gore, pločica uglavnom sadrži sve dezene koji se obično koriste za ukrašavanje noktiju u ovo doba godine :D
Odlične je kvalitete, ne znam ako ste ikad probali neku od pločica sa BPS-a ali po mome mišljenju one su u rangu sa onima od MoYou London ali sa puno prihvatljivijom cijenom!
Ova je trenutno na akciji i košta samo 0,99$, a bila je 2,99$!
Odlična  prilika!! (po mom mišljenju)
 Evo i direktan LINK do pločice u slučaju da vas interesira ;)


 I kinda wanted to put every design there is on my nails, so you can see how they look.
Only the black polish is for stamping, so I'm pretty happy how the other ones look!

Željela sam staviti sve dezene sa pločice na nokte da možete vidjeti kako izgledaju.
Samo je crni lak namijenjen za pečatiranje, tako da sam prilično zadovoljna kako su drugi ispali!

Polishes I've used / Lakovi koje sam koristila: 

Alpine snow - O.P.I (as a base / podloga)
Black stamping polish - Essence
The Spy Who Loved Me - O.P.I (red / crveni) 
 Flormar - M105 (brown / smeđi)
Sparkling seaweed - Northern Star Polish (green / zeleni) - REVIEW/ RECENZIJA 
 Space queen - Essence ( top coat)


 What do you think? Did you ever tried any of the BPS's stamping plates?

I kako vam se čini? Jeste li ikad probali neku od BPS pločica za pečatiranje?


Thank you for reading, don't forget to find me on

 Till the next time xoxo  

Hvala na čitanju, ne zaboravite me naći i na

Do slijedećeg puta xoxo 

Sunday, December 7, 2014

MMS - Cartoon

Hello my friends, how are you? 
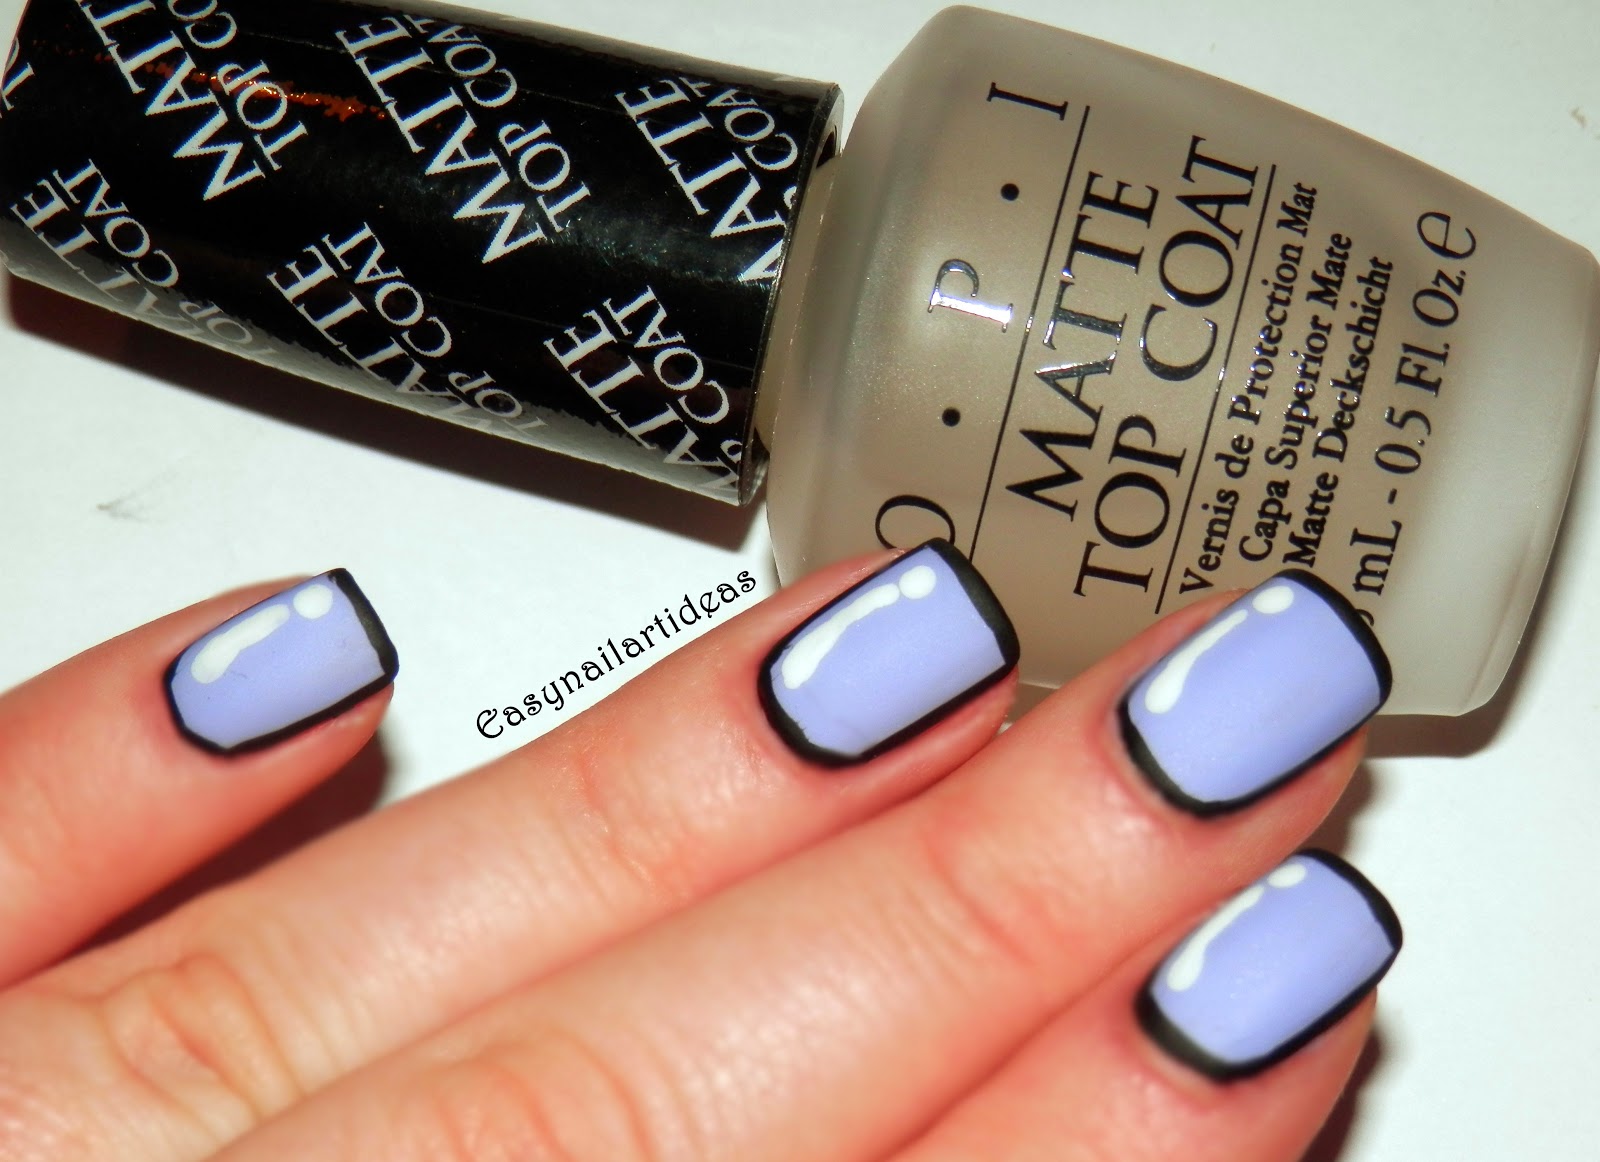
Today's assignment for the Matching Manicure Sunday is cartoon nail art, so I decided to recreate one that I first saw on cutepolish's channel!

 To be honest, I taught the assignment for this Sunday is something else and that's why I did this  easy and quick design (I didn't have enough time today to do something "better"). 


For this design I've used:

O.P.I - You're Such A Budapest 
O.P.I - Alpine Snow
Kiko - Black
Essie -  Good To Go Top Coat 
O.P.I - Matte Top Coat


First I've applied 4 coats of You're Such A Budapest, yep you'll need 3 to 4 coats for reach full opacity and to even things out. The formula is so watery and this is the only O.P.I polish that I've tried and don't like! I've bought it because the color is pretty and a LOT of bloggers and nail artist praised about it and recommended it,but it's really bad, at least for my taste :/
This is just second time I've used it, and I have it for months!! 
 Then I've done the black frame with Kiko black polish and striping brush, after that I've added white dot and stripe with dotting tool! 
I've put Essie's good to go first because my Matte top coat tends to smudge my art :/
Minute and few photos latter I added matte top coat and that was it =) 

Here's few shiny photos :


 And Matte ones:


And that's it =) What do you guys think? 
I like the way it looks on the nails :D

Thank you for reading, don't forget to find me on

 till the next time xoxo 

You can check out what other girls did here:

Tuesday, December 2, 2014

Goodbye Fall 2014. design!

Hello my friends, how are you doing? Today I'll show you last fall design that I did for this year. The temperature is getting lower everyday and snow is just about to come (in my country at least), so it's about time to say goodbye to fall and leaves and say hallo to snowflakes, snow and Christmas :D
What's the best way to say goodbye to fall then to do a nail art ;)) 


For this design I've used:

China Glaze - Dare To Be Bare 
O.P.I - Goldeneye  
Water decals from Moon Sugar Decals 
Essie - Good To Go top coat

First I've applied 2 coats of Dare To Be Bare, I waited for that to dry a little and then I put Goldeneye on the tips. For the best effect wipe almost all the polish from the brush and then apply small amount little above the center of your nail! Apply more polish on the tips so you get gradient glitter effect!


DARE TO BE BARE by China Glaze is a perfect milky color that I've been searching for a while now. I used 2 thin coats in the photos above! I think it can reach full opacity with 3 coats. 
It's perfect for french manicures or for the natural clean look! I love it!!


After my base dried out completely I applied water decals from Moon Sugar Decals.
They have over 150 different types of decals to chose from!
This ones retails for $3,99 for the whole sheet, shipping is free in the US and $2.99 for the rest of the world! 
You can check it out HERE!  

Autumn fall decals are perfect in shape and colors! As for any other water decals, you have to cut the desired image, put it into the water (room temperature) and wait for about 10-20 seconds until the image starts to separate from the white paper base!
Then you transfer it on the nail and, for this ones, you have to press and hold for a while. I've noticed that the best thing to do that is to take a peace of paper towel and press with that for about 30 seconds! 
After that, apply your favorite top coat and that's it! Perfect mani is done!!


They kinda look like real small leaves :D


 This was my goodbye from the fall 2014. 
I hope you liked the design and you'll try it someday :D

Thank you for reading, don't forget to find me on

 till the next time xoxo

Monday, December 1, 2014

MMS: GRADIENT + stamping plate review

Hi guys, hope you're doing great =) 
I'm a day late for this weeks matching manicure Sunday, sorry  :/ . 
This week's theme is gradient and since it's already a December I decided to post a winter design.


This is the design that I applied for the "winter is coming" giveaway run by Ditta's nail art & design, I hope it'll bring me luck :D


 I've used :

POLISHES: 
1. O.P.I - Alpine Snow (white )
2. Gothic Gala Lacquers - Crush (light blue )
3. O.P.I - He Blue It This Time! (blue)
4. O.P.I - My Signature Is "DC" (silver )
5. Essence - Cool Breeze ( effect topper) 
6. Essence - stamping white polish 

 I've used 1.,2., and 3. for the gradient / ombre! 
I did and whole post/tutorial on how to do a gradient/ombre nails so if you don't know how , you can learn HERE!!

For the stamping (snowflakes) I've used 3., 4., and 6. 

TOOLS:
make-up sponge (for the gradient)
tape (to protect my nails and reduce cleaning up)
 stamping plate QA58 from Born Pretty Store
stamper and scraper
This is the plate I've used =) I must say it's perfect for this time of the year and a must have for any nail art / stamping lover! 
I pretty much used every snowflake there is on the plate, because I wanted to have all of them on my nails and because they are all different in the nature too so... 
It really made my life easier because I could never paint such small and perfect snowflakes freehanded! 
The quality of the plate itself is really good, even the smallest snowflakes transfer completely onto the nail. 
It retails for $2.99 and I highly recommend it to everyone who likes stamping!!
If you want you can use a 10% discount code HE10K31 
You can find this plate HERE!! 


So what do you think? I'm really happy how it turned out :D

Thank you for reading, don't forget to find me on


You can check out what other girls did here: