Search This Blog

Showing posts with label #nailart. Show all posts

Sunday, July 26, 2015

MMS - Glitter Sandwich Manicure

Pozdrav noktoljupci =) Kako ste mi danas?
Ovotjedna tema za Matching Manicure Sunday je gliter sendvić manikura :D
Evo kako sam ju ja izvela...

Hello my nail lovers =) How are you today?
This week's theme for Matching Manicure Sunday is glitter sandwich manicure :D
And this is how I did it...


za ovu manikuru sam koristila / For this design I've used :
  • China Glaze - Dare To Be Bare
  • Let it glitter! - Oh Wow!
  • Essie - Good To Go - top coat


Prvo sam nalakirala jedan sloj Dare To Be Bare. Kad se osušio stavila sam Oh wow! šljokice i to sam radila kao neki gradijent!
Dodala sam još jedan sloj Dare To Be Bare i na kraju nadlak!
I to je to... stvarno jednostavna a baš lijepa i efektna manikura.
Ako niste toplo vam preporučam da ju probate =)

First I painted a coat of Dare To Be Bare. When that dried I added Oh wow! glitters, I did sort of a gradient with them!
I added another coat of Dare To Be Bare and a top coat and that was it!
This is really easy to do and it's still really pretty and effective.
I highly recommend you to try this manicure if you haven't already =)


Ovo je prvi put da radim sendvić manikuru i baš mi se sviđa kako je ispalo :D
Što vi mislite? Dali vam se sviđa?

This is the first time I'm doing sandwich manicure and I'm really happy how it turned out :D
What do you think? Do you like it?

Hvala na čitanju =) / Thank you for reading =)
You can find me also on  

Pogledajte što su druge cure napravile / check out what other girls did:
  

Tuesday, March 10, 2015

Nail Art Water Decals DLS - 193 from Born Pretty Store

Hello my nail lovers =)
Today I'll show you Nail Art Water Decals DLS - 193 from Born Pretty Store!
Pozdrav moji noktoljupci =)
Danas ću vam pokazati vodene naljepnice  DLS - 193 sa Born Pretty Store-a !
picture is from BPS web site
These decals comes in one sheet (as seen on the photo above) so you have to cut them on the size that fits the nail! But that really isn't a problem!

Ove naljepnice dolaze ovako cijele na jednom papiru ( kao na slici gore) pa ih se treba izrezati na veličinu nokta! Ali to i nije neki problem!


HOW TO USE / KAKO KORISTITI:

You cut the shape and dip it into the water for approximately 20 sec.
Then you remove white paper background and  place the image onto the nail!
I found out that they work the best if you dry them a little with a paper towel before you place them onto the nail. 
After that you have to press and keep pressing for like 15-30 sec before they're stucked onto the nail.
They are really easy to apply!

Izreže se naljepnica i stavi u vodu na cca 20 sekundi.
Zatim se izvadi iz vode i makne bijela podloga te se naljepnica stavi na nokat!
Otkrila sam da najbolje funkcioniraju ako se malo posuše sa papirnatom maramicom, prije nego se stave na nokat.
Nakon toga naljepnicu treba pritisnuti ( na noktu) i držati tako 15-30 sek sve dok se ne zalijepi. 
Jako se lako nanesu!


For the base I used the best white nail polish that I've tried so far - My Boyfriend Scales Walls by O.P.I.
The color is actually off white, with the grey undertone, but it's not very noticeable on the nails!
The formula is amazing, fully opaque in 2 coats!!
Although it's not in their normal range, you can still find it on eBay (I did)!


Kao bazu sam koristila najbolji bijeli lak koji sam do sada probala - My Boyfriend Scales Walls od O.P.I.
Boja je zapravo nekako off bijela, sa sivim podtonom, ali to se ne primjeti jako na noktima!
Formula je odlična, potpuno pokriva sa 2 sloja!!
Iako nije u sastavu njihove standardne linije može se lako naći na eBayu ( ja sam ga tamo kupila) !


So what do you think? 
I must say I love them, they're beautiful and really easy to apply =)

I što mislite?
Moram reći da su meni super, jako su lijepe i doista se lako nanose =)


You can buy them HERE for $ 1,99
Don't forget to use a code HE10K31 for 10% off

Možete ih kupiti OVDJE za 1,99$
Ne zaboravite na kod HE10K31 za 10% popusta =) 


Thank you for reading, don't forget to find me on
 Till the next time xoxo  

Hvala na čitanju, ne zaboravite me naći i na
Do slijedećeg puta xoxo 

Monday, March 2, 2015

MoYou Nails plate 101 + stamping polish by BPS

Hello nail lovers =) How are you doing?
Today I'll show you plate 101 from MoYou Nails and what I did with it! 

Pozdrav noktoljupci, kako ide?
Danas ću vam pokazati pločicu za pečatiranje broj 101 od MoYou Nails i što sam sa njom napravila!


This is how the plate looks (image is from google).. For me the images are super cute =)

Ovako pločica izgleda ( slika je sa googlea).. Meni su dezeni baš slatki =)


 For the base I've used Hrvatska Ljubav by Parrot Polish (review)

Kao bazu sam koristila Hrvatska Ljubav od Parrot Polish-a (recenzija)


As you can see I did one design with owls using white stamping polish from Essence.
Second design is with these funny eyes xD

Kao što možete vidjeti napravila sam jednu manikuru sa sovicama koristeći bijeli lak za pečatiranje od Essence-a.
Drugu sam napravila sa ovim smiješnim očima xD


For the base I used (S)Wimbledon by Catrice. Gorgeous sorta like a neon mint polish <3
 
Kao bazu sam koristila  (S)Wimbledon od Catrice-a. Predivni nekako neonski mint lak <3


For this one I used black stamping polish from BPS.
It retails for 2,93$ at the moment (it was 4,19$) and here is the direct LINK!
This polish has quite tick consistency but I could live with that. The thing that bothers me  is that no mater how long I wait before applying top coat it always smudges this polish.
You can always see some small stripes - frustrating.
I know it's not the problem in my top coat bc I use the same one all the time.
So overall I wouldn't recommend it to you!

Za ovaj sam dizajn koristila crni lak za pečatiranje od BPS-a.
Trenutno košta 2,93$ (bio je 4,19$) i evo direktnog linka ako vas zanima!
Sam lak je dosta gust, ali s tim bih i mogla živjet. Ono što me smeta kod njega je da bez obzira koliko dugo čekam prije nego nanesem top coat , uvijek se raspacka.
Male crne crtice su vidljive kad god nanesem top coat - frustrirajuće.
Znam da problem nije u mom top coatu jer uvijek koristim istoga.
Tako da vam ga nebi baš preporučila!


And that's it =) My interpretation of the plate 101 =)
You can get it HERE for £4.49, its 10% OFF!

I to je to =) Moja interpretacija pločice 101 =)
Možete ju naći OVDJE za £4.49, sada je na 10% popusta!

Thank you for reading, don't forget to find me on
 Till the next time xoxo  

Hvala na čitanju, ne zaboravite me naći i na
Do slijedećeg puta xoxo 

Tuesday, December 2, 2014

Goodbye Fall 2014. design!

Hello my friends, how are you doing? Today I'll show you last fall design that I did for this year. The temperature is getting lower everyday and snow is just about to come (in my country at least), so it's about time to say goodbye to fall and leaves and say hallo to snowflakes, snow and Christmas :D
What's the best way to say goodbye to fall then to do a nail art ;)) 


For this design I've used:

China Glaze - Dare To Be Bare 
O.P.I - Goldeneye  
Water decals from Moon Sugar Decals 
Essie - Good To Go top coat

First I've applied 2 coats of Dare To Be Bare, I waited for that to dry a little and then I put Goldeneye on the tips. For the best effect wipe almost all the polish from the brush and then apply small amount little above the center of your nail! Apply more polish on the tips so you get gradient glitter effect!


DARE TO BE BARE by China Glaze is a perfect milky color that I've been searching for a while now. I used 2 thin coats in the photos above! I think it can reach full opacity with 3 coats. 
It's perfect for french manicures or for the natural clean look! I love it!!


After my base dried out completely I applied water decals from Moon Sugar Decals.
They have over 150 different types of decals to chose from!
This ones retails for $3,99 for the whole sheet, shipping is free in the US and $2.99 for the rest of the world! 
You can check it out HERE!  

Autumn fall decals are perfect in shape and colors! As for any other water decals, you have to cut the desired image, put it into the water (room temperature) and wait for about 10-20 seconds until the image starts to separate from the white paper base!
Then you transfer it on the nail and, for this ones, you have to press and hold for a while. I've noticed that the best thing to do that is to take a peace of paper towel and press with that for about 30 seconds! 
After that, apply your favorite top coat and that's it! Perfect mani is done!!


They kinda look like real small leaves :D


 This was my goodbye from the fall 2014. 
I hope you liked the design and you'll try it someday :D

Thank you for reading, don't forget to find me on

 till the next time xoxo

Friday, November 14, 2014

Make Your Own Nail Wraps/Decals

Hello my polished friends =) hope you're doing great!! 
I posted this mani few days ago on my Facebook page and some of you said you want to know how I did it so here it is =) .. Just for you :* 


I saw this technique a long ago from YouTube nail artist Meliney but I was lazy to try it till now :/ 

Let me first tell you what I used :  

Gold Silk by Parrot Polish on my thumb, index and pinky finger (REVIEW)
Blanc by Essie on middle and ring finger (REVIEW)
 Stamper and 
Scraper (REVIEW)
Stamping plate - MoYou London Pro collection 08 (REVIEW) 
Good to Go! Fast drying top coat by Essie 


 Basically, I did everything that you normally do when you do stamping: apply polish on the desired image on the plate, scrape the excess polish with the scraper, press the stamper onto the image so it transfer completely from plate to stamper.
Now (this part is different) I filled the design with different polish colors (green,orange,dark pink), using nail art brush, on the stamper!! You don't transfer the image onto your nail jet!
When I filled the image, I applied top coat over it and let it dry for about 30 min if you apply fast drying top coat!!
After the image on the stamper dries, you have to take tweezers and gently separate it from the stamper and transfer it onto the nail. Make sure the base color is still wet so the image can stick to it (or add a coat of top coat on the base color)!! 
After you place and set your decal add some top coat over because it smoothes everything out!

Don't worry if the image is bigger than your nail, just put some acetone or nail polish remover on  Q-tip or brush and remove it. Decal is made of polish so it come off easily!! 

And that's it, its very easy and allows you to have perfect design!


Usually when I do stamping I can't transfer entire image on my nail, especially if my nails are longer, so this is the perfect way I get the perfect design on my entire nail :D

I hope this post helps you to create beautiful designs =) 
I would love to see your work, so please tag me on Facebook or Instagram  =)

Thank you for reading, don't forget to find me on
 
Till the next time xoxo  

Monday, November 10, 2014

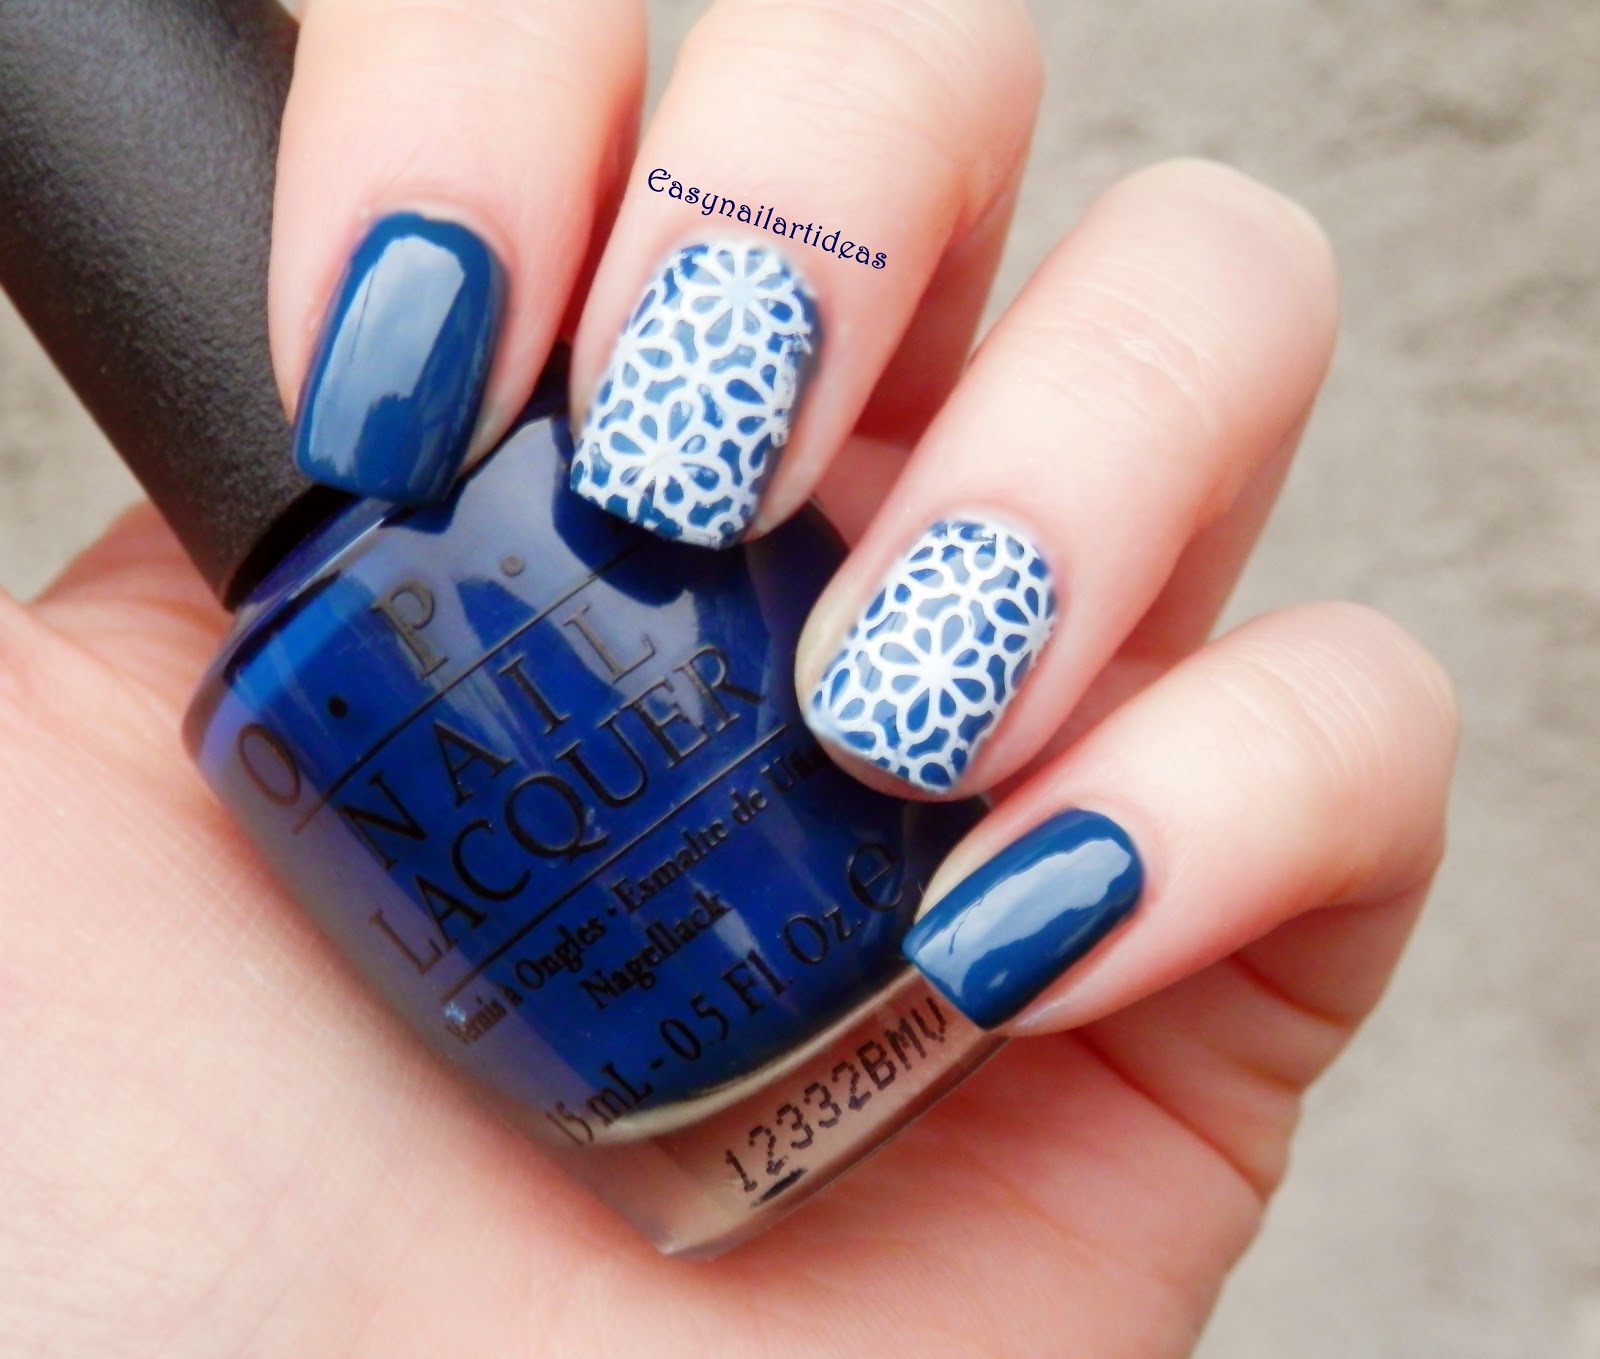
O.P.I - I Saw...U Saw...We Saw...Warsaw + nail art


most recent stamping adventure =)
Hello my friends =) hope you're doing great!!  On this rainy Croatian day I decided to review an oldie but goody by O.P.I! I bought this polish I think in June for 4 euros (it was on sale 70% off) but since I like more of a bright/neon polishes in summer I didn't really use this one till now!! 
I love this polish so much that I decided to write a post just for it :D

 I Saw...U Saw...We Saw...Warsaw (I love the name) is a dark blue creme, opaque in 2 easy coats, dries quickly with nice shine!
It's part of O.P.I's Euro Central Collection for spring/summer 2013., although it's more of a fall/winter color for me (at this point)
I've done 3 nail arts so far using this polish, 2 of them you already saw if you're following my blog on regular basis... 

Dry marble technique - TUTORIAL
TUTORIAL

I absolutely love this polish from color to formula to finish, it's absolutely perfect for me. And to think just few months ago I was telling that blue polishes looks weird on my nails and I didn't wear them lol 

For this nail art, I've used stamping plate QA65 from bornprettystore (READ MORE ABOUT THE PLATE HERE!) 


Discount code for BornPrettyStore - HE10K31 

What do you think of this polish? Do you own it?
Did you like my nail art? 

Don't forget to find me on: 

Thank you for reading my blog :*
Till the next time xoxo  

Wednesday, October 29, 2014

Matching Manicures - RED!!

Hello guys, hope you're doing great =) Although Sunday is the day for Matching Manicures post, I'm a bit late for this one so I'm doing it today!! First I taught I'll past this RED assignment because I'm not really a red nail polish person but then I've been organizing  my polish racks yesterday and I realize I have the most amazing red color so I just had to use it and do this post :D

The red polish I'm talking about is Burning Embers by Northern Star Polish and I did REVIEW while back about it.. I also used it in my Little Mermaid nail art because I taught it look perfect for Ariel's hair ;)

So here's is todays simple look :


I've used chevron stickers from bps (REVIEW) and Kiko nail lacquer in black!
This design reminds me a little of Dracula and his teeth ... it's a bit Vampy in my opinion!


I also did a matte version of this design just adding my O.P.I Matte Top Coat, and I kinda prefer this one =)


How do you like my red/black design? Do you think it's Halloween appropriate? Let me know in the comments bellow 

You can also find  me on Bloglovin', Instagram, Facebook and Twitter 

You can check out what other girls did here :

Till the next time xoxo


Sunday, October 19, 2014

Ruffian nails - BREST CANCER AWARENESS!!

Hello my friends , hope you're having an amazing weekend =)
It's Sunday and that means it's time for another matching manicure post =))
Today's assignment was to do a ruffian nails. This is such an easy design and I must say my first time doing it =))


I didn't use any kind of stickers or tips to create this just my hands and some nail polish :D


The polishes I've used:

MY SIGNATURE IS "DC" by O.P.I - silver (REVIEW)
FIJI by Essie - light pink

There's not much philosophy around this manicure it's really simple and the only thing you need is steady hand and some nail polish. Or if you don't have steady hand use french tip stickers and that's it =))


Let me know what you think about this design and colors I've chose for it in the comments bellow =) I love to read your opinion :D <3

with flash 
You can also find  me on Bloglovin', Instagram, Facebook and Twitter 

If you want to know what other girls did, click on the links bellow:

Thank you for reading, till the next time xoxo