Search This Blog

Showing posts with label #bornprettystore. Show all posts

Tuesday, March 10, 2015

Nail Art Water Decals DLS - 193 from Born Pretty Store

Hello my nail lovers =)
Today I'll show you Nail Art Water Decals DLS - 193 from Born Pretty Store!
Pozdrav moji noktoljupci =)
Danas ću vam pokazati vodene naljepnice  DLS - 193 sa Born Pretty Store-a !
picture is from BPS web site
These decals comes in one sheet (as seen on the photo above) so you have to cut them on the size that fits the nail! But that really isn't a problem!

Ove naljepnice dolaze ovako cijele na jednom papiru ( kao na slici gore) pa ih se treba izrezati na veličinu nokta! Ali to i nije neki problem!


HOW TO USE / KAKO KORISTITI:

You cut the shape and dip it into the water for approximately 20 sec.
Then you remove white paper background and  place the image onto the nail!
I found out that they work the best if you dry them a little with a paper towel before you place them onto the nail. 
After that you have to press and keep pressing for like 15-30 sec before they're stucked onto the nail.
They are really easy to apply!

Izreže se naljepnica i stavi u vodu na cca 20 sekundi.
Zatim se izvadi iz vode i makne bijela podloga te se naljepnica stavi na nokat!
Otkrila sam da najbolje funkcioniraju ako se malo posuše sa papirnatom maramicom, prije nego se stave na nokat.
Nakon toga naljepnicu treba pritisnuti ( na noktu) i držati tako 15-30 sek sve dok se ne zalijepi. 
Jako se lako nanesu!


For the base I used the best white nail polish that I've tried so far - My Boyfriend Scales Walls by O.P.I.
The color is actually off white, with the grey undertone, but it's not very noticeable on the nails!
The formula is amazing, fully opaque in 2 coats!!
Although it's not in their normal range, you can still find it on eBay (I did)!


Kao bazu sam koristila najbolji bijeli lak koji sam do sada probala - My Boyfriend Scales Walls od O.P.I.
Boja je zapravo nekako off bijela, sa sivim podtonom, ali to se ne primjeti jako na noktima!
Formula je odlična, potpuno pokriva sa 2 sloja!!
Iako nije u sastavu njihove standardne linije može se lako naći na eBayu ( ja sam ga tamo kupila) !


So what do you think? 
I must say I love them, they're beautiful and really easy to apply =)

I što mislite?
Moram reći da su meni super, jako su lijepe i doista se lako nanose =)


You can buy them HERE for $ 1,99
Don't forget to use a code HE10K31 for 10% off

Možete ih kupiti OVDJE za 1,99$
Ne zaboravite na kod HE10K31 za 10% popusta =) 


Thank you for reading, don't forget to find me on
 Till the next time xoxo  

Hvala na čitanju, ne zaboravite me naći i na
Do slijedećeg puta xoxo 

Friday, December 12, 2014

Santa nail art using water decals

Hello my nail art lovers :D , how are you today? Any snow in your countries? 
Yesterday I made another easy Christmas / Santa nail art that doesn't request any special nail art skills.

Pozdrav noktoljupci :D kako ste mi danas? Ima li što snijega kod vas?
Jučer sam napravila još jedan Božićno/zimski dizajn za kojeg vam ne trebaju nikakve posebne vještine, jako je jednostavan za napravit!


Of course it's a red - green combination, what else :D and it glows in the dark!!

Naravno, kombinacija je crveno - zelena, a ča drugo :D i svijetli u mrakuuuu!


What did I use / Što sam koristila:

RED is / CRVENI je ; Parrot Polish - Santa Glow  (review/recenzija)

GREEN is / ZELENI je ; Parrot Polish - Grinch Glow (review/recenzija)

GLITTERY TOP COAT is /  ŠLJOKIČASTI TOP COAT je ; Essence - Space Queen

and WATER DECALS / i VODENE NALJEPNICE 


 I love this polishes that glows in the dark, so amazing!!

Obožavam  ove lakove koji svijetle u mraku, zakon su!!
  

I've got this water decals from Born Pretty Store to review, and I can honestly say they're the best ones I've tried so far. I believe that's because they're made on a thin transparent foil that when applied on the nail stick perfectly and the edge of the decal is not even visible (you can see on the photo bellow). 
I've tried few different  water decals brands but they were all made on ticker foil and you have to press them hard, for like a minute or so, before it's applied on the nail and the line remains visible even after applying top coat (sometimes even 2 coats)!

Dobila sam ove naljepnice od  Born Pretty Store za recenziju, i mogu iskreno reći da su najbolje naljepnice koje sam do sada probala. Vjerujem da je to zbog toga što su rađene na tankoj prozirnoj foliji koja se, kada se aplicira na nokat savršeno zalijepi i rub naljepnice postaje skroz nevidljiv ( to se vidi i na slici ispod).
Probala sam nekoliko naljepnica i od drugih brendova ali sve su bile rađene na debljim folijama koje je trebalo stisnuti i držati tako cca minutu da bi se zalijepile za nokat i svejedno je rub ostao vidljiv pa čak i nakon top coata ( nekad i 2 sloja)!


This particular Christmas / Santa decals are BLE1763 and they're on the discount now for only 0,99$. They were 2,86$ when I got them! 
I didn't get only these ones because I've choose the entire sheet that has 11 patterns and its + $ 4,00 on the original price. So you can get 11 diferent patterns for $4,99 now! 
Don't forget about 10% discount code HE10K31 if you decide to buy anything!

Ove Djed / Božićne  naljepnice su BLE1763 i sada su na popustu za samo $0,99. Bile su 2,89$ kad sam ih ja odabrala!
Nisam uzela samo ove, već sam izabrala cijeli list na kojem ima 11 različitih uzoraka za dodatak od $ 4,00 na početnu cijenu. Tako da dobijete 11 uzoraka za $ 4,99 sad!
Ne zaboravite na kod za 10% popusta HE10K31 ako odlučite kupiti nešto!


 Thank you for reading, don't forget to find me on

 Till the next time xoxo  


Hvala na čitanju, ne zaboravite me naći i na

 Do sljedećeg puta xoxo


Monday, December 8, 2014

Stamping plate QA19 review and nail art / Pločica za pečatiranje QA19, recenzija i nail art

Hello my dear nail art friends, I hope you're doing great =) 
Today I'll share with you a review of a Christmas  themed stamping plate that I've got from Born Pretty Store

Pozdrav moji dragi noktoljupci, nadam se da ste super =)
Danas ću podijeliti sa vama recenziju pločice za pečatiranje Božićne tematike, koju sam dobila sa Born Pretty Store-a!  


As you can see on the photo above, it has pretty much every design or image that's been usually done in this time of the year on our nails :D 
 Quality is great, I don't know if you ever tried any of the BPS plates but in my opinion they're in range with the MoYou London ones with much more acceptable price!
This one is on sale now and it retails for only 0,99$, it was $2,99 before!
Great deal!! (in my opinion)
 HERE is a direct link to it in case you're interested ;)

 Kao što možete vidjeti na slici gore, pločica uglavnom sadrži sve dezene koji se obično koriste za ukrašavanje noktiju u ovo doba godine :D
Odlične je kvalitete, ne znam ako ste ikad probali neku od pločica sa BPS-a ali po mome mišljenju one su u rangu sa onima od MoYou London ali sa puno prihvatljivijom cijenom!
Ova je trenutno na akciji i košta samo 0,99$, a bila je 2,99$!
Odlična  prilika!! (po mom mišljenju)
 Evo i direktan LINK do pločice u slučaju da vas interesira ;)


 I kinda wanted to put every design there is on my nails, so you can see how they look.
Only the black polish is for stamping, so I'm pretty happy how the other ones look!

Željela sam staviti sve dezene sa pločice na nokte da možete vidjeti kako izgledaju.
Samo je crni lak namijenjen za pečatiranje, tako da sam prilično zadovoljna kako su drugi ispali!

Polishes I've used / Lakovi koje sam koristila: 

Alpine snow - O.P.I (as a base / podloga)
Black stamping polish - Essence
The Spy Who Loved Me - O.P.I (red / crveni
 Flormar - M105 (brown / smeđi)
Sparkling seaweed - Northern Star Polish (green / zeleni) - REVIEW/ RECENZIJA 
 Space queen - Essence ( top coat)


 What do you think? Did you ever tried any of the BPS's stamping plates?

I kako vam se čini? Jeste li ikad probali neku od BPS pločica za pečatiranje?


Thank you for reading, don't forget to find me on

 Till the next time xoxo  

Hvala na čitanju, ne zaboravite me naći i na

Do slijedećeg puta xoxo 

Tuesday, September 16, 2014

Diamond Nail Glitter and Picker wax pen from Born Pretty Store

Hello my friends, after some connection problems and spending almost an hour on the telephone trying to resolve it , I finally did =) Exciting morning for me lol
Now that my internet is all set up I can write a review on Diamond nail glitter and Wax pen that I got from BPS few days ago!


I got the Diamond Nail Glitter Glequins Dust Powder Sheet Nail Art Decoration (the official name) in 2 colors - silver and gold.

Both of the colors have a holographic glow witch makes them so pretty and easily combined with all sorts of colors! The silver ones looks like a disco ball to me lol


They come in a little round plastic box but the amount of the glitters is so big that I think it will last me for ages!


Obviously, they have to be placed onto the nail one by one, in this case the Wax pen come in really handy. I also got mine from BPS, you actually get 2 of them in a pack!
When you apply this glitters you have to make sure your polish is still wet so they can stick to it or you can use a nail glue if you have one! If the polish is not wet enough, the ends of the glitters will not stick properly and  you'll get sharp and protruding ends, and then the glitters will fall of easily! Of course, after you place the glitters you'll have to apply some top coat to keep them in place! 


These Wax pens are so good for picking glitters or studs, and makes the placing part so easy and precise! As you can see I've only sharpen one of them and this is the size I can go without the tip falling off :/ A little downside of my pen.. I don't know if the other one will act like this too but we'll see. 
The tip is still big enough to pick and hold even the biggest studs I have... The only thing that I'm a bit worried is that if it continues to fall of , the pen wont last a long time :/


Here are the direct links to the Diamond Glitters and Wax Pen if you want to check them out yourself.

Let me show you what I did with them...


 As a base I've used O.P.I's IN THE CABLE CAR-POOL LINE that I reviewed in my last post (find it HERE) and for the picture bellow the base is I KNEAD SOUR-DOUGH from the same post! 


dont forget to use a 10% off code HE10K31 
The Born Pretty Store have a promotion that ends tomorrow so make sure you're not late:
Nail Art New Arrival, Make Order Win Voucher!
Each order reach the amount can get a voucher for your next order.
order $10-$20 can get $3 voucher, $20-$40 can get $7, order over $40 can get $15 voucher! 

You can also find me on InstagramBloglovinTwitter and Facebook  

till the next time xoxo  


Thursday, July 31, 2014

Nail art using beautiful blue roses water decals

Hi guys, hope your having a great day so far =) Mine was pretty calm and relaxing. I didn't do much today I'm just chillin' and being lazy .. but that's what summer is for right? :D

Today I'm gonna show you some beautiful water decals that I got from Born Pretty Store ,tell you all about them and show you the design I've made using them.

First let me show you how they look..


As you can see they look beautiful, but they don't came cut out to fit your nails (like nail wraps). You have to cut them yourself on sizes that fits your planed design. For me this isn't a bad thing because this way you can do whole nail, just tips or place single rose wherever you like.

For my first design I decided to cover entire nail with the design and this is how it looks..


How did I do this:
I painted 3 of my nails in a shimmery indigo blue color, I've used Nicole by O.P.I called Listen to Your Momager  from their Kardashian collection. This is a dark blue jelly base filled with light blue micro glitters (very pretty). I used 2 coats plus top coat.
Then I painted 1 coat of white polish (Alpine Snow by O.P.I) on my accent nails.
I waited for the colors to dry and then I cut out the images to approximately fit my nails.
Then I removed the transparent foil that was covering the decals and dip them into the water (one at the time) for about 30 seconds.  You'll know if the decals are ready by gently moving your thumb across the design, if the design is separating from the white paper base then they're ready to be used. At this point I just separated the decal from the base and placed them onto my nail, they don't stick right away so you have time to place them where you want.
I've dried the nail (decal) with some paper towel and then removed the access of the decal with  polish remover. The final step is, as always, the top coat. And that's it =)
oh yeah I almost forgot I've made a dots on the blue base with a gold shimmery polish, just to add a little touch =)


 They're really easy to use and to remove latter on. Also great quality and price ($2,86).


In case you want to try them you can find them HERE!
Don't forget to use code HE10K31 for 10% off any order + free shipping worldwide =)

till the next time xoxo

My Instagram, Bloglovin', Facebook, Twitter  


Tuesday, July 29, 2014

Neon studs, review and nail art

Hello my friends, how are you today? I've been stuck at home because it's been raining here like it's fall not summer :/ the weather's gone crazyyy

If you saw my previous post, the one about my first mani swap with lovely Andreea from Ditta's nail design & art, then you've probably noticed the neon studs that I've used to create that mani.
In case you missed that post here's the LINK.


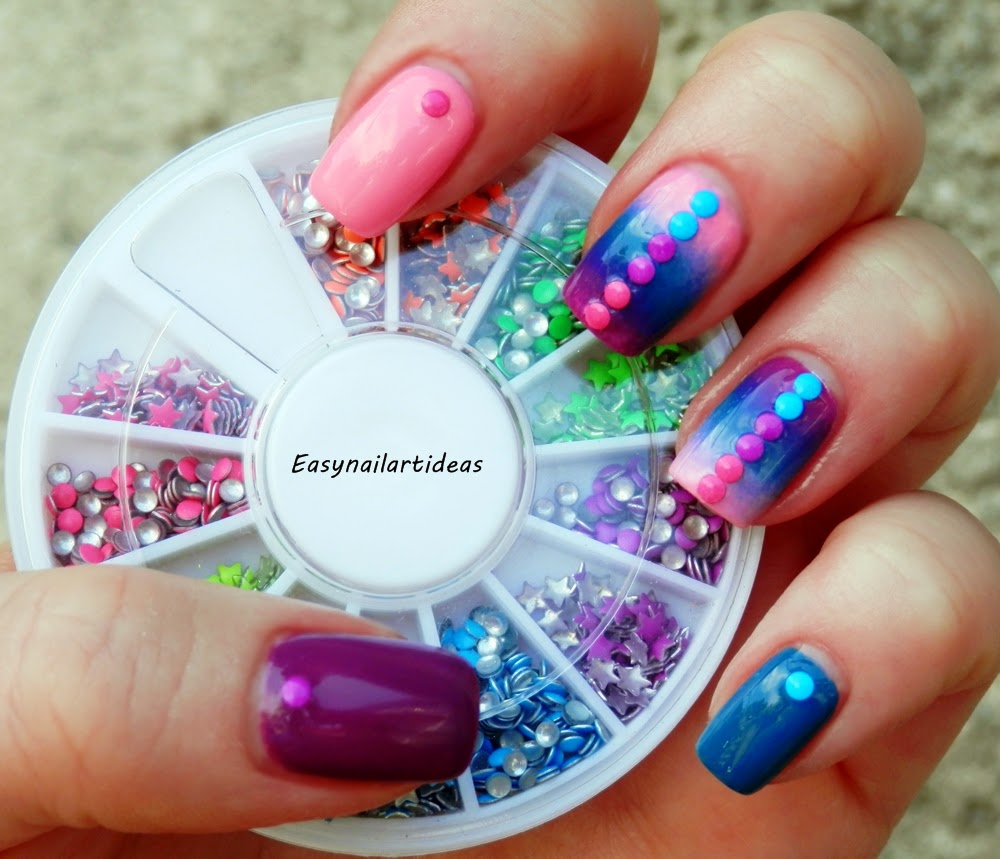
 I've got these neon nail studs from Born Pretty Store, they came in a cute little round wheel. The wheel is packed with 300 round and star shaped studs in blue, green, pink, yellow, orange and purple that are placed separately. They are really easy to use and you can do a lot of different designs with them. I did 2 so far =) but I have a lot more coming =)


 When you take them off, the aceton will erase the color from them and will leave you with a silver studs which I think is great because that way you get completely new studs that can be use for more metallic or glam looking designs =) I think that's a big plus!


 Let me now show you my second design (ps this one is 100% mine)

outside 
inside with a flash
my left hand is a bit different =)


 I will do a step by step tutorial for this second design, so if you would like to see that visit back tomorrow =) Ps if you would like to be updated as soon as new post gets published make sure to follow me on Bloglovin' , with Google+ or via email =)

Overall I really like this neon nail studs they look gorgeous plus they're great quality and so easy to use. You can get them from BPS web store , here's the LINK , for just $5,99 (free shipping worldwide)

don't forget to use a cupone code for 10% off


 Hope you've enjoyed todays post =)

till the next time xoxo


Thursday, June 12, 2014

Sailor's (summer) nail art


Hi guys, hope you're doing great. Today I have to show you a super fun, summer nail art that I've done few days ago.

I think these kind of manicures are really suitable and popular for this time of year so I said to myself why not, I have to do it too =)

 It's a sailor kinda manicure for which I've used born pretty store water decals.

You can find them here : http://www.bornprettystore.com/nail-water-decals-transfers-sticker-compass-chain-anchor-pattern-k069-p-6207.html only $1,99 =))
 
right hand
left hand

You can see how the accent nails are different, let me tell you why.
At first my idea was completely different. I wanted to use blue,white, red and gold polishes and do like a stripes with those colors and then put the decals on top.. but this particular decals does not work good over any darker base.


These are the decals. First of all I want to say they're absolutely gorgeous. They came in a pretty small package so they are enough for like 2 manicures. And on the back you can find how to use them. Although that's really easy to use.


Now let me show you my "problem" and why I had to change my nail art idea.

As you can see the decals don't stand out on the darker base and they loose their purpose :/
I didn't wanted to take that off so I used my detail brush and I filled out the images


So I ended up using a white base and blue franch  tip, and I think it looks pretty good.


OVERALL : The decals are pretty good quality, really easy to use and they are beautiful. Just keep in mind (if you decide to buy them) to layer them over white or some similar lighter base so they can stand out and be beautiful =)

Don't forget to use a code to get 10%off your order ;)))

Don't forget to use a code to get 10%off your order ;)))