Search This Blog

Showing posts with label spring nail art. Show all posts

Monday, May 4, 2015

MMS - SKITTLETTE MANICURE

Pozdrav noktoljupci =) kako ste mi danas?
Evo i mene nakon dugooo izbivanja u novoj MMS temi. Ovaj tjedan to je skittlette manikura pa evo što sam ja napravila...

Hello nail art lovers =) how are you today? 
Here I am after looong time ready to participate in this week's theme and that is skittlette manicure, well here's what I did... 


Za ovu manikuru sam koristila moja 2 omiljena pastelna laka a to su LILACISM i FIJI od Essie, te vodene naljepnice sa born pretty storea. 
Probala sam nekoliko različitih brendova vodenih naljepnica i moram reći da su mi ove sa BPS-a najbolje!
Recenziju nijh možete pročitati OVDJE!

For this manicure I've used my 2 favorite pastel polishes - LILACISM and FIJI by Essie, and water decals from born pretty store.
I've tried  different brands of water decals and I have to say that the ones from BPS are the best 4 me!
You can find review of these decals HERE!


 I kako vam se čini? 

So what do you think?

Pogledajte što su druge cure napravile / check out what other girls did:


Sunday, March 1, 2015

Pink Roses Water Decals from BPS

Hello my nail lovers =)
After a really rough weak for me, I finally manage to write this review that I supposed to do weeks ago!
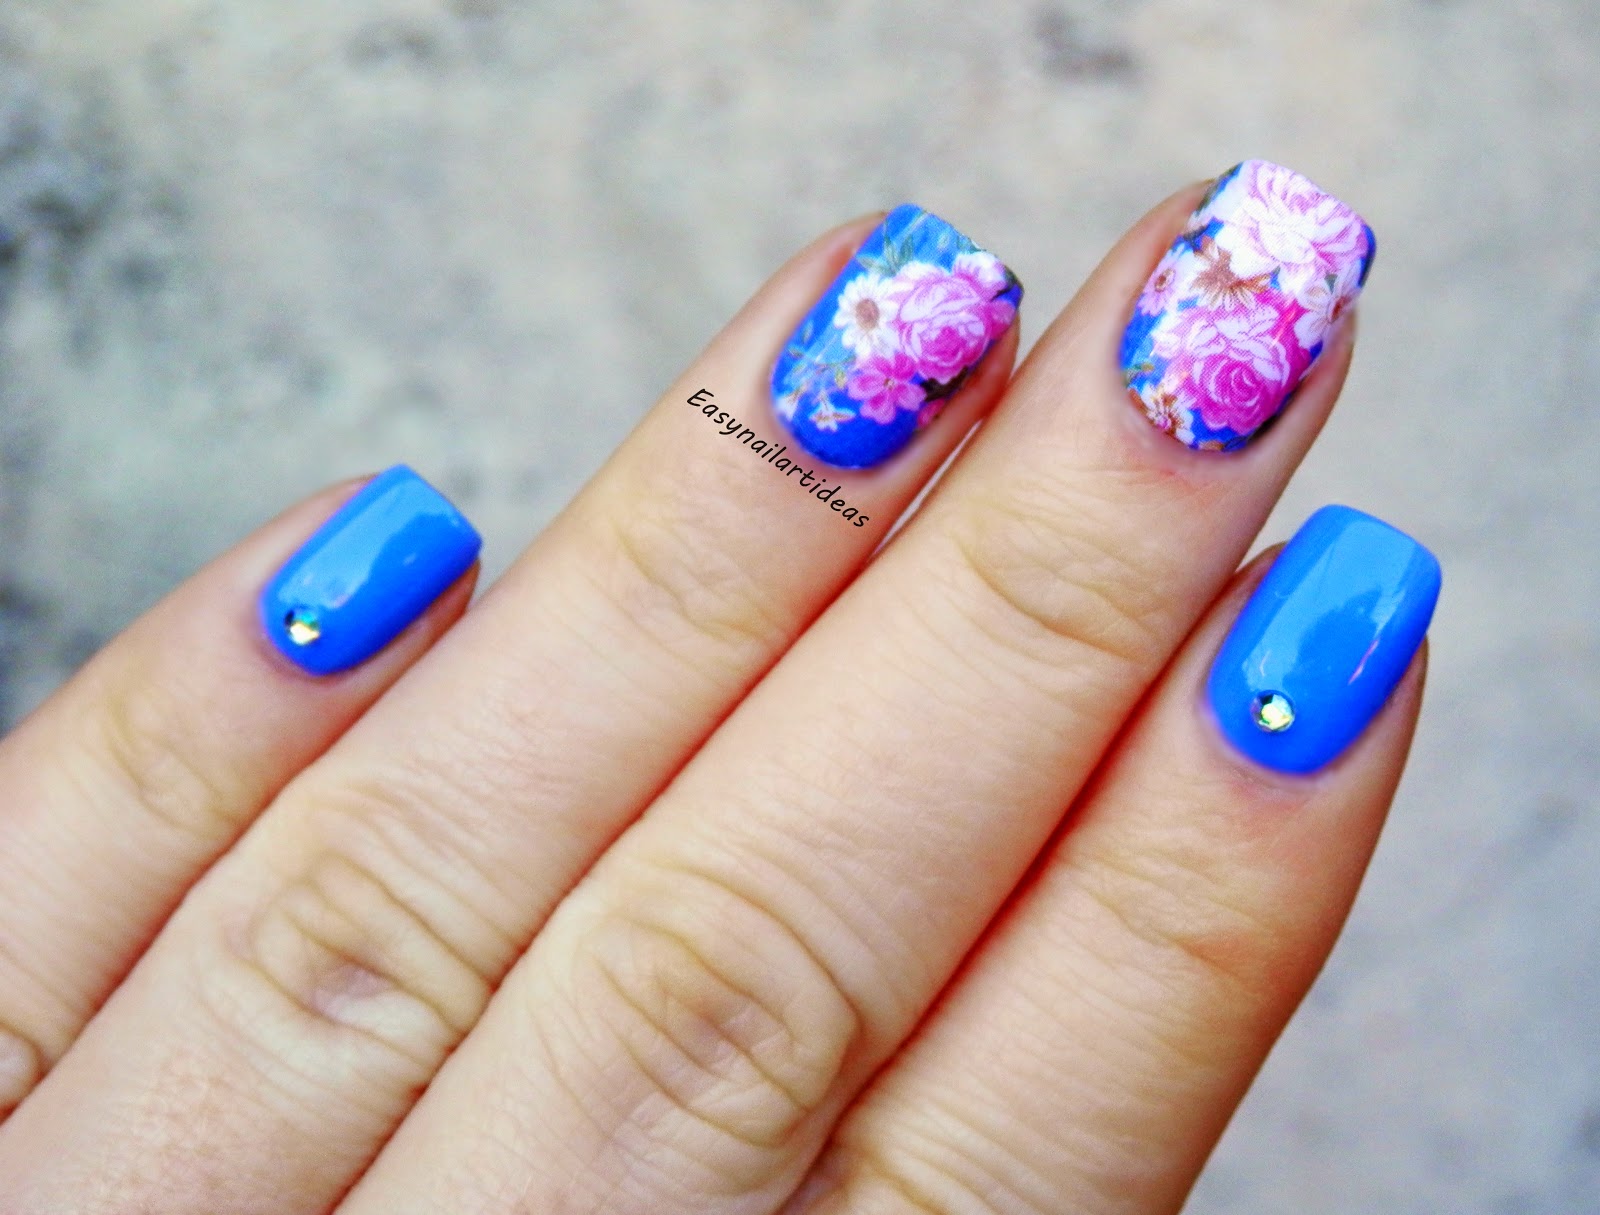
Today I'll show you how to use a floral water nail wrap from Born Pretty Store!

Pozdrav moji noktoljupci =)
Nakon teškog tjedna, konačno sam uspijela napisati ovu recenziju koju sam trebala već pred par tjedana!
Pokazati ću vam kako koristiti ove cvjetne vodene naljepnice sa Born Pretty Store-a !


These gorgeous pink roses nail wraps are made to fit the nail. 
There are 12 different sizes so you pick the one that you think it's right for certain nail plus you get a little nail file =)

Ove divne naljepnice sa uzorkom rozih ruža su napravljene da pokriju cijeli nokat. 
 Ima 12 veličina pa treba izabrati onu koja najbolje odgovara određenom noktu i još se dobije mala rašpica =)

 
HOW TO USE / KAKO KORISTITI:

You cut the shape and dip it into the water for approximately 20 sec.
Then you remove white paper background and  place the image onto the nail!
I found out that they work the best if you dry them a little with a paper towel before you place them onto the nail. 
After that you have to press and keep pressing for like 30-60 sec before they're stucked onto the nail and then file of the rest ( this is when the little file comes handy).

Izreže se naljepnica i stavi u vodu na cca 20 sekundi.
Zatim se izvadi iz vode i makne bijela podloga te se naljepnica stavi na nokat!
Otkrila sam da najbolje funkcioniraju ako se malo posuše sa papirnatom maramicom, prije nego se stave na nokat.
Nakon toga naljepnicu treba pritisnuti ( na noktu) i držati tako 30-60 sek sve dok se ne zalijepi. 
Višak se izrašpa ( zbog toga se dobije i rašpica).


 I painted my ring and middle finger with one coat of regular transparent base coat!
For the other nails I used HYACINTH by Paint Shop Polish ( REVIEW) and STONES from BPS!

Na nokte na koje sam stavljala naljepnice sam  nanijela samo prozirni bazni lak!
Na ostale sam stavila HYACINTH Paint Shop Polish-a (RECENZIJA) i CIRKONE sa BPS-!


HYACINTH matches perfectly the color on the wraps :D

HYACINTH  se savršeno poklapa sa bojom na naljepnicama :D

 
 So what do you think? 
I must say I love them, they're beautiful and pretty easy to apply =)

I što mislite?
Moram reći da su meni super, jako su lijepe i dosta se lako nanose =)

You can buy them HERE for $ 1,99
Don't forget to use a code HE10K31 for 10% off

Možete ih kupiti OVDJE za 1,99$
Ne zaboravite na kod HE10K31 za 10% popusta =) 


Thank you for reading, don't forget to find me on
 Till the next time xoxo  

Hvala na čitanju, ne zaboravite me naći i na
Do slijedećeg puta xoxo 


Saturday, February 21, 2015

Welcome spring nail art =)


Hello nail lovers =) How are you today?
Although the calendar says we have to wait another month for spring to come, these past few days were like spring is already come to my town. It was beautiful sunny weather that drown me into doing some floral nail art =)
I have 2 easy, dotticure designs to show you today so let's get started :D 


Pozdrav noktoljkupci =) kako ste mi danas?
Iako kalendar govori da ćemo na proljeće čekati još mjesec dana, ovih par dana je u mom gradu bilo predivno sunčano vrijeme koje me ponukalo da napravim cvjetnu manikuru =) 
Imam vam za pokazati dvije lagane, točkaste manikure , pa krenimo :D


This manicure was inspired by Spring Bouquet Collection by Paint Shop Polish that I reviewed last weak!
Polishes are simply gorgeous and perfect for spring!
As I already mentioned I did the flowers with dotting tool, it's super easy!
I just put 5 little dots for the flower and then one in the middle ( silver )!


 Ova je manikura inspirirana kolekcijom koju sam recenzirala prošli tjedan - Spring Bouquet, Paint Shop Polish-a!
Ti lakovi su mi predivni i savršeni za proljeće!
Kako sam i prije spomenula, cvijetići su napravljeni sa točkalicom, to je stvarno lako!
Samo sam napravila pet točkica u krug i jednu u sredinu (srebrnu ) i cvjetić je tu!
 

I've used / Koristila sam :

Daisy, Hyacinth and Tulip by Paint Shop Polish (REVIEW)

Alpine Snow and My Signature Is DC by O.P.I (REVIEW)

Good To Go by Essie (Top Coat)

Small dotting tool / malenu točkalicu 

I also added Essence by Parrot Polish over and here are the results ...
Stavila sam i Essence od Parrot Polish-a preko ove manikure i evo što sam dobila ...


And now the second one... 

A sada manikura br 2 ....


I did this design a while back but just didn't post it till now... This one is bit more serious!

Ovu sam manikuru napravila pred dosta vremena ali nikako da ju objavim.. Malo je ozbiljnija!

I've used / Koristila sam:

Ski Teal We Drop, Alpine Snow and My Signature Is DC by O.P.I 

Dotting tool / točkalicu


So what do you think? Witch one you prefer?

I što mislite? Koja vam je bolja?


Thank you for reading, don't forget to find me on
 Till the next time xoxo  

Hvala na čitanju, ne zaboravite me naći i na
Do slijedećeg puta xoxo 


Monday, January 26, 2015

Bubbly nail art =)

Hello my nail art lovers, how are you today?
I have a cold so I'm not so good, but I'm hoping I'll get better soon!

Pozdrav dragi noktoljupci, kako ste mi danas?
Ja sam pokupila neku prehladu pa i nisam nešto, ali se nadam da ću brzo ozdraviti!

Today I'll show you one easy but very interesting design that I've tried  few days ago but didn't have time to write about it!!

Danas ću vam pokazati jednu laganu ali jako interesantnu manikuru koju sam isprobala prije nekoliko dana ali nisam imala vremena pisati o njoj!!


I did 2 versions, one with the white frame other with silver!

Napravila sam 2 verzije, jednu sa bijelim jednu sa srebrnim rubom!


How I did it: / Kako sam to napravila:

I had 2 coats Always On My Mint by Essence (REVIEW) as a base, but you can use simple white polish!
Then I took peaces of alluminium foil and I put few drops of polish remover on it (you can use some kind of a plastic holder too, same thing on witch you would put polish when you're doing dots)! 
After the remover I put few drops of nail polish (color of your choice) and mixed them together, this step is important to dilute the polish a bit!
Then I took a Q-tip and dipped it into the diluted polish and did dots with it.... and the bubbly effect was here!! =)

Imala sam 2 sloja Essence-ovog Always On My Mint (RECENZIJA) kao bazu, ali možete koristiti i bijeli lak!
Onda sam na komadiće aluminijske folije stavila par kapi odstranjivača laka za nokte (možete koristiti i neku plastičnu posudicu umjesto folije, isto ono što koristite kad radite točkice) te par kapi laka za nokte ( boja po izboru)!
Izmiješala sam ih kako bi se lak malo razrijedio i onda sam sa štapićima za uho radila točke na noktima ... i efekt balonića je bio tu!! =)


 So what do you think? Would you try it?
Do you like the one with the white or silver frame better?

I što mislite? Biste li ju probali? 
Da li vam se sviđa više ova s bijelim ili srebrnim rubom?
Thank you for reading, don't forget to find me on
 Till the next time xoxo  

Hvala na čitanju, ne zaboravite me naći i na
Do slijedećeg puta xoxo  


Saturday, March 22, 2014

Collaboration and tutorial

Hi guys, few weeks ago my friend Monica suggested me a collaboration. Without even thinking I said YES!!
The idea of doing a collaboration with such a great nail artist like Monica was so exiting but also challenging. We didn't have to think too much to select a theme ..
We both agree that it have to be CHERRY BLOSSOM =). The perfect design for beginning of spring.

So these are our finished manicure =) As you can see they are very much different. I based my design more on the branches with little flowers while Monica has focused more on the beautiful cherry flowers =)

 To see Monica's other great designs check her fb page Moni's Mani and to read her post about our collaboration you can check her blog : http://monismani.wordpress.com/

Now it's time to show you how I did it :

1. I painted my nails base color, I used essie -Blanc ( you can use any white polish you have)


2. I put a light blue polish on the make-up sponge, that I dabbed into my nail to create an ombre effect ... you can use any kind of sponge you have, or if you don't own them, they really cheep..


With this light blue- white ombre I tried to create something that looks like the sky in the background ...

3. I added some branches with black nail striper


4. With dotting tool I added two shades of pink dots that represents  flowers


5. I added some smaller black dots inside of the flowers, added top coat and that was it =)


I'm so happy that I did this collaboration and although this was the first one for me I'm sure it won't be the last ;)
I hope you liked this as much as I did and that the tutorial was helpful for you..
If you ever try any of my designs please send me your photos  because I would love to see them <3

Till the next post xoxo